 "valsidalv, reminding you that infiniti is an option" (valsidalv)
07/02/2015 at 11:30 • Filed to: None
 2
2
 5
5|
"valsidalv, reminding you that infiniti is an option" (valsidalv)
07/02/2015 at 11:30 • Filed to: None | 2
| 5 |
An overview of what you need to know for when you decide to swap out your coil over spark plugs for the first time.
(A while back I wrote a piece
!!!error: Indecipherable SUB-paragraph formatting!!!
to encourage people to work on their cars whenever possible. Sometimes you tend to follow model-specific instructions so closely that you lose track of the bigger picture. Here is what I learned after changing my spark plugs.)
!!! UNKNOWN HEADER TYPE (MULTI-LINE BREAK?) !!!
Let me just paraphrase Wikipedia a bit here (
!!!error: Indecipherable SUB-paragraph formatting!!!
):
A spark plug is a device that processes an electric current from a car’s ignition system and creates an electric spark in the engine’s combustion chamber. The spark ignites the compressed fuel/air mixture in the chamber which moves the piston (cylinder) and makes the car go.
Still confused? No problem, have a diagram.
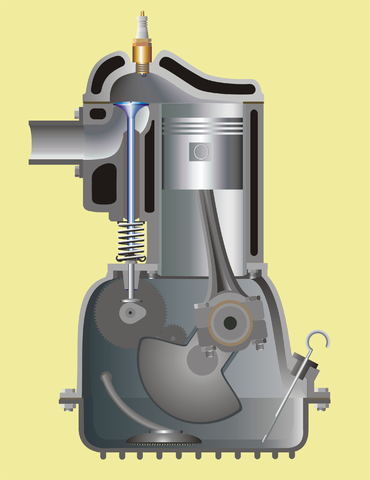
This is a cutaway of a combustion chamber. The gold/white thing sticking out at the top is the spark plug. When the spark plug creates a spark, the gases in that upper chamber ignite, which means they expand. Since they have nowhere to go they push down on the cylinder. When the cylinder moves it rotates the crankshaft and with the help of some other hocus pocus that rotational energy translates into forward motion for your vehicle! Seriously though, let’s just stick to spark plugs for now.
This next image is one that I love and it demonstrates the cycles of a four-stroke gasoline engine. This is really interesting shit and you can spend hours reading up on it but for the purpose of this writeup we can isolate our interest to step 3 - the Power step. That’s when the spark plug does its thing and produces that spark/explosion in the animation. Notice how I said
gasoline
engine: don’t try to change the spark plugs in your diesel car, because you don’t have any. Diesel engines operate at much higher compression ratios than their gasoline counterparts and that greater pressure is enough to heat and ignite the gases on its own.
One last thing that deserves a mention is the device that supplies the current to the spark plug. It is called a coil and sits on top of the plug. You have to remove it in order to access the plug. There is (usually) one coil/plug combo per cylinder.
!!! UNKNOWN HEADER TYPE (MULTI-LINE BREAK?) !!!
All you need to do in order to replace a spark plug is to take out the old one and put in a new one. However, the plugs aren’t just waiting to be removed when you open the hood - you need to get to them first and in some cases it can be a bit of a pain. Here is a generic list of steps:
Pop the hood and disconnect the battery.
Remove whatever may be in the way between you and the spark plug coils. This can include engine covers, wiring harnesses, hoses and tubes, intakes... you name it.
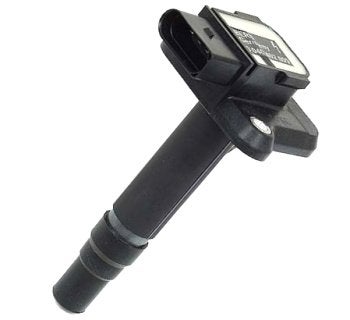
Disconnect the electrical harness plug for the coils - making note of which plug is connected to which coil if not already labeled - then remove the coils (pictured on the left).
Use a spark plug socket with an extension attached to a ratchet wrench to reach into each chamber and remove the spark plug.
Apply some anti-seize lubricant to the threads of the new spark plug and, using the extension, put the new plug into its chamber.
Tighten using a torque wrench to your car’s specifications. It’s important not to over-tighten because you can strip out the threads.
Put the coils back in place and reattach the plugs from the electrical harness.
Replace anything else you disconnected, tidy up, and start the car to see if you messed anything up. But you didn’t because you followed these simple steps.
!!! UNKNOWN HEADER TYPE (MULTI-LINE BREAK?) !!!
If your manufacturer likes you then you might be presented with one of the following views:
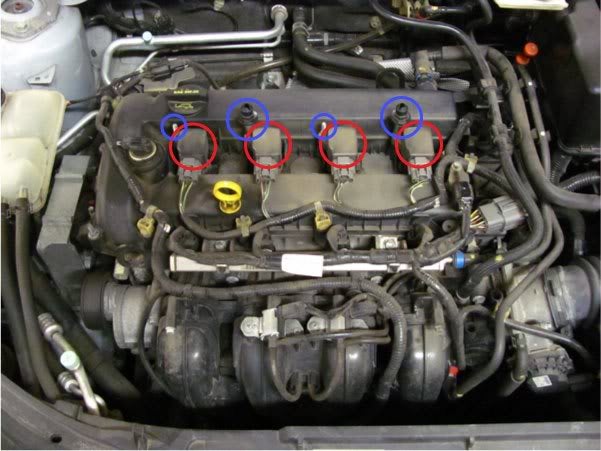
This is a Mazda 3. The red circles are the coils and the blue circles are the bolts that hold the coils down. The only thing that needed to come off was the engine cover which was held in place by clips. The tutorial is here: !!!error: Indecipherable SUB-paragraph formatting!!!
The next image is of a VW GTI. Once again, after removing the engine cover the author was presented with the coils (semi-transparent bits with a shiny cover on top) and a very neat harness. Those Germans really thought of everything and you can see the numbers indicating which plug goes to which coil. Source: !!!error: Indecipherable SUB-paragraph formatting!!!

However, if your manufacturer does not like you, you might see something like the following:
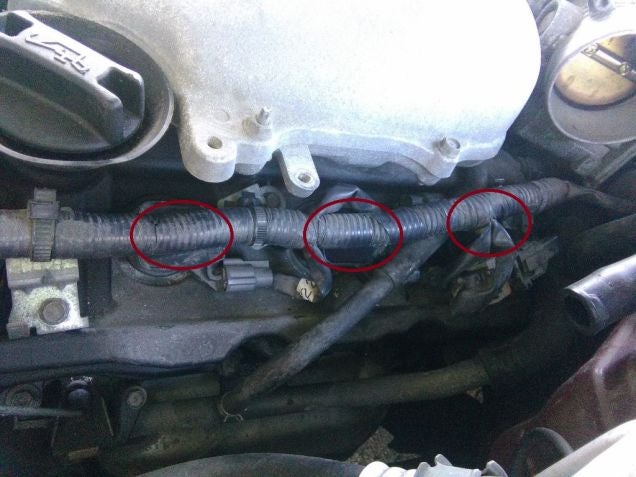
This (above) is my Infiniti G35x with its V6. The driver-side coils - circled in red - are behind a difficult-to-move harness which is ziptied and secured in multiple places. Also I had to remove my intake tube to even reach this point. The other 3 plugs on the passenger side were even more difficult to get to. Other Opponauts have complained primarily about transverse mounted engines (one side of the “V” faces the front of the car and the other faces the back, which is much more difficult to access) so I probably had it easy, even though it took me a few hours.
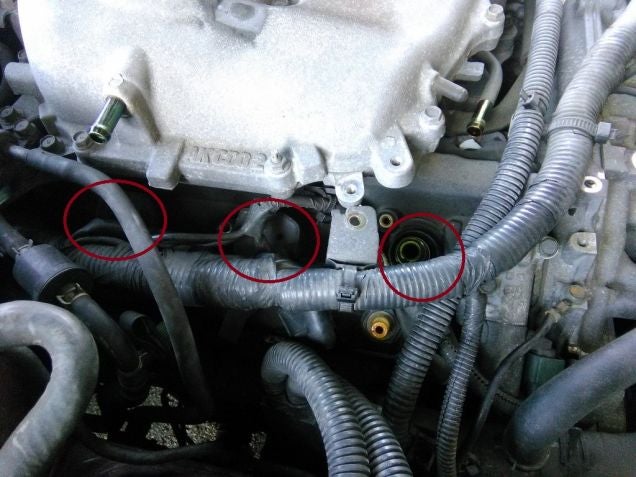
This is the passenger-side after I removed many things. If you take a look at the right-most circle you’ll notice that I have already removed the coil and spark plug. It’s a bit hard to tell from the pic but the spark plug sits several inches deep.
!!! UNKNOWN HEADER TYPE (MULTI-LINE BREAK?) !!!
On top of the “regular” tools you might need to reach your spark plugs, here is a list of tools you will need that you may not have.
Extension

A socket/ratchet extension simply gives you more reach. You will need one of these to get access to the plug in its chamber. These can be purchased individually but I’ve seen sets of 3 for not much more than getting just the one. Make sure the drive matches your socket wrench. 10” should be enough for most vehicles.
Spark Plug Socket
This is a deep socket that also contains a rubber insert. When you push the socket over the plug it will squeeze into the rubber insert and stay in place, allowing you to lift the plug up and out of the chamber. Otherwise you can flip your car over and let the spark plug fall out on its own, I guess.
I have heard of some people using a spring-loaded pickup tool. Either will work, though a spark plug socket will also let you lower and screw the plug back in. I’d recommend it. Note: spark plug sockets do come in different sizes so you will need to get the right one for your spark plugs. Somewhat frustratingly my spark plugs did not indicate their size on the packaging so I opened up one package, compared the size to different sockets, and bought what I needed right in the store.
Torque Wrench
This is a good tool to have in your arsenal and you can use it for almost anything. Believe it or
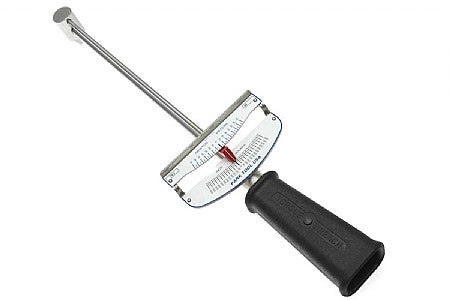
not, sometimes parts need to be tightened to specifications instead of “one-half turn past hand tight” and this is very important for spark plugs because most engine blocks are aluminum and it is softer than steel so you can strip the threads. Torque wrenches come in two flavours: an old-school one that uses a metal arm to indicate how much torque you are applying on a printout of a gauge (pictured), and something that looks just like a normal socket wrench but gives you the ability to set a maximum torque and it won’t tighten past that (it can even have a digital display). The first one is much simpler and, as a result, significantly cheaper. The second style is somewhat easier to use, depending on who you ask (just remember to set the torque setting back to 0 when you store the wrench or you can mess up the calibration).
!!! UNKNOWN HEADER TYPE (MULTI-LINE BREAK?) !!!
You can usually buy this in a tube or jar, and even a small amount will probably be enough for a lifetime’s worth of spark plug replacements. This lubricant is crucial to ensuring that your plug does not get forever stuck in your engine - it counteracts the high temperatures in the engine and keeps the two metals (your engine and the plug) separate.
Note: the use of anti-seize was advocated to me by a coworker who has been doing his own maintenance for many years, and it is mentioned in online tutorials. However, NGK has a PDF (
!!!error: Indecipherable SUB-paragraph formatting!!!
) where they say that their spark plugs are installed dry. However the document is a few years old now and you can do your own investigating to decide whether or not you will use it.
!!! UNKNOWN HEADER TYPE (MULTI-LINE BREAK?) !!!
!!! UNKNOWN HEADER TYPE (MULTI-LINE BREAK?) !!!
Attach the spark plug socket to your extension and the wrench and insert it into the chamber. Push down, and you will feel when the plug goes into the rubber insert. Now, rotate (just remember: lefty loosey righty tighty)! It may be difficult but it will come free. I was surprised by just how much force I needed to apply to get past the first turn so don’t hold back (keep in mind that it’s a car , not a faberge egg).
!!! UNKNOWN HEADER TYPE (MULTI-LINE BREAK?) !!!
It’s best to screw the plug into its chamber by hand the first few turns to ensure that it got seated correctly so you don’t need the wrench for this part. Attach your spark plug socket to the extension and insert the spark plug into the rubber part of the socket. Lower it down into the chamber and screw it in a bit. Once you are certain the plug is going in straight you can attach the wrench to the extension and tighten it.
This might be the end of the story for many of you but I ran into an interesting (and nerve-wracking) scenario. After I screwed in my first plug and torqued it, I pulled the extension bar out and... the spark plug socket did not follow suit. The grip that the rubber insert had on the seated spark plug was more powerful than the force of the socket head sitting on the extension, so the socket remained on the plug all the way down in the chamber. I started to freak out a bit but always remember that you can put the extension back onto the socket and take the whole assembly out. So what I ended up doing was: very loosely fitting the spark plug to the spark plug socket, lowering it down and screwing it in just a bit, removing the socket head and putting in a regular (no rubber insert) deep socket onto the extension, and then finishing the job.
!!! UNKNOWN HEADER TYPE (MULTI-LINE BREAK?) !!!
Use a system that YOU can understand which will easily tell you which plugs you’ve already swapped. Obviously it’s best to just go in order but it doesn’t hurt to have a fail-safe. I would clean the tops of the coils before securing them back onto the plugs. If a coil was clean - the plugs were new. It was pretty simple.
!!! UNKNOWN CONTENT TYPE !!!
Hopefully some Opponauts more knowledgeable than I can share their experiences with changing plugs.
 505Turbeaux
> valsidalv, reminding you that infiniti is an option
505Turbeaux
> valsidalv, reminding you that infiniti is an option
07/02/2015 at 11:33 |
|
just a note, you should make note in the first sentence that this is for coil over plug designs only. If you throw a distributor system into any of this it doesnt work that well
 RamblinRover Luxury-Yacht
> valsidalv, reminding you that infiniti is an option
RamblinRover Luxury-Yacht
> valsidalv, reminding you that infiniti is an option
07/02/2015 at 11:37 |
|
Coil on plug? Next you’ll be leaving out how to adjust points, dagnabbit.
|
valsidalv, reminding you that infiniti is an option
> 505Turbeaux
07/02/2015 at 11:38 |
|
Noted, thanks.
|
RamblinRover Luxury-Yacht
> 505Turbeaux
07/02/2015 at 11:43 |
|
Free association of his pictures leads one to imagining a cam-in-crank reverse-flow flathead with coil on plug. That would be... different, certainly.
 Dingers Ghost, Champion Jockey
> valsidalv, reminding you that infiniti is an option
Dingers Ghost, Champion Jockey
> valsidalv, reminding you that infiniti is an option
07/02/2015 at 21:22 |
|
Here are my tips for replacing the spark plugs in a Ford 5.4 V8

Just sell the truck and move on.
Side note: when you were talking about torque wrenches, you mentioned that a click type wrench will not over torque what you set it to, this is not true. A click tpye wrench will click at the set amount, but if you ignore this it will continue to apply torque to whatever it is you are using it on.