 "zeontestpilot" (zeontestpilot)
10/27/2015 at 08:00 • Filed to: Houselopnik
 2
2
 23
23|
"zeontestpilot" (zeontestpilot)
10/27/2015 at 08:00 • Filed to: Houselopnik | 2
| 23 |

This has easily been the most annoying (didn’t say difficult) house project I’ve done to date. I spent half a day going from bathroom to attic, to bathroom to attic...you get the idea. Let me relate to you my tale.
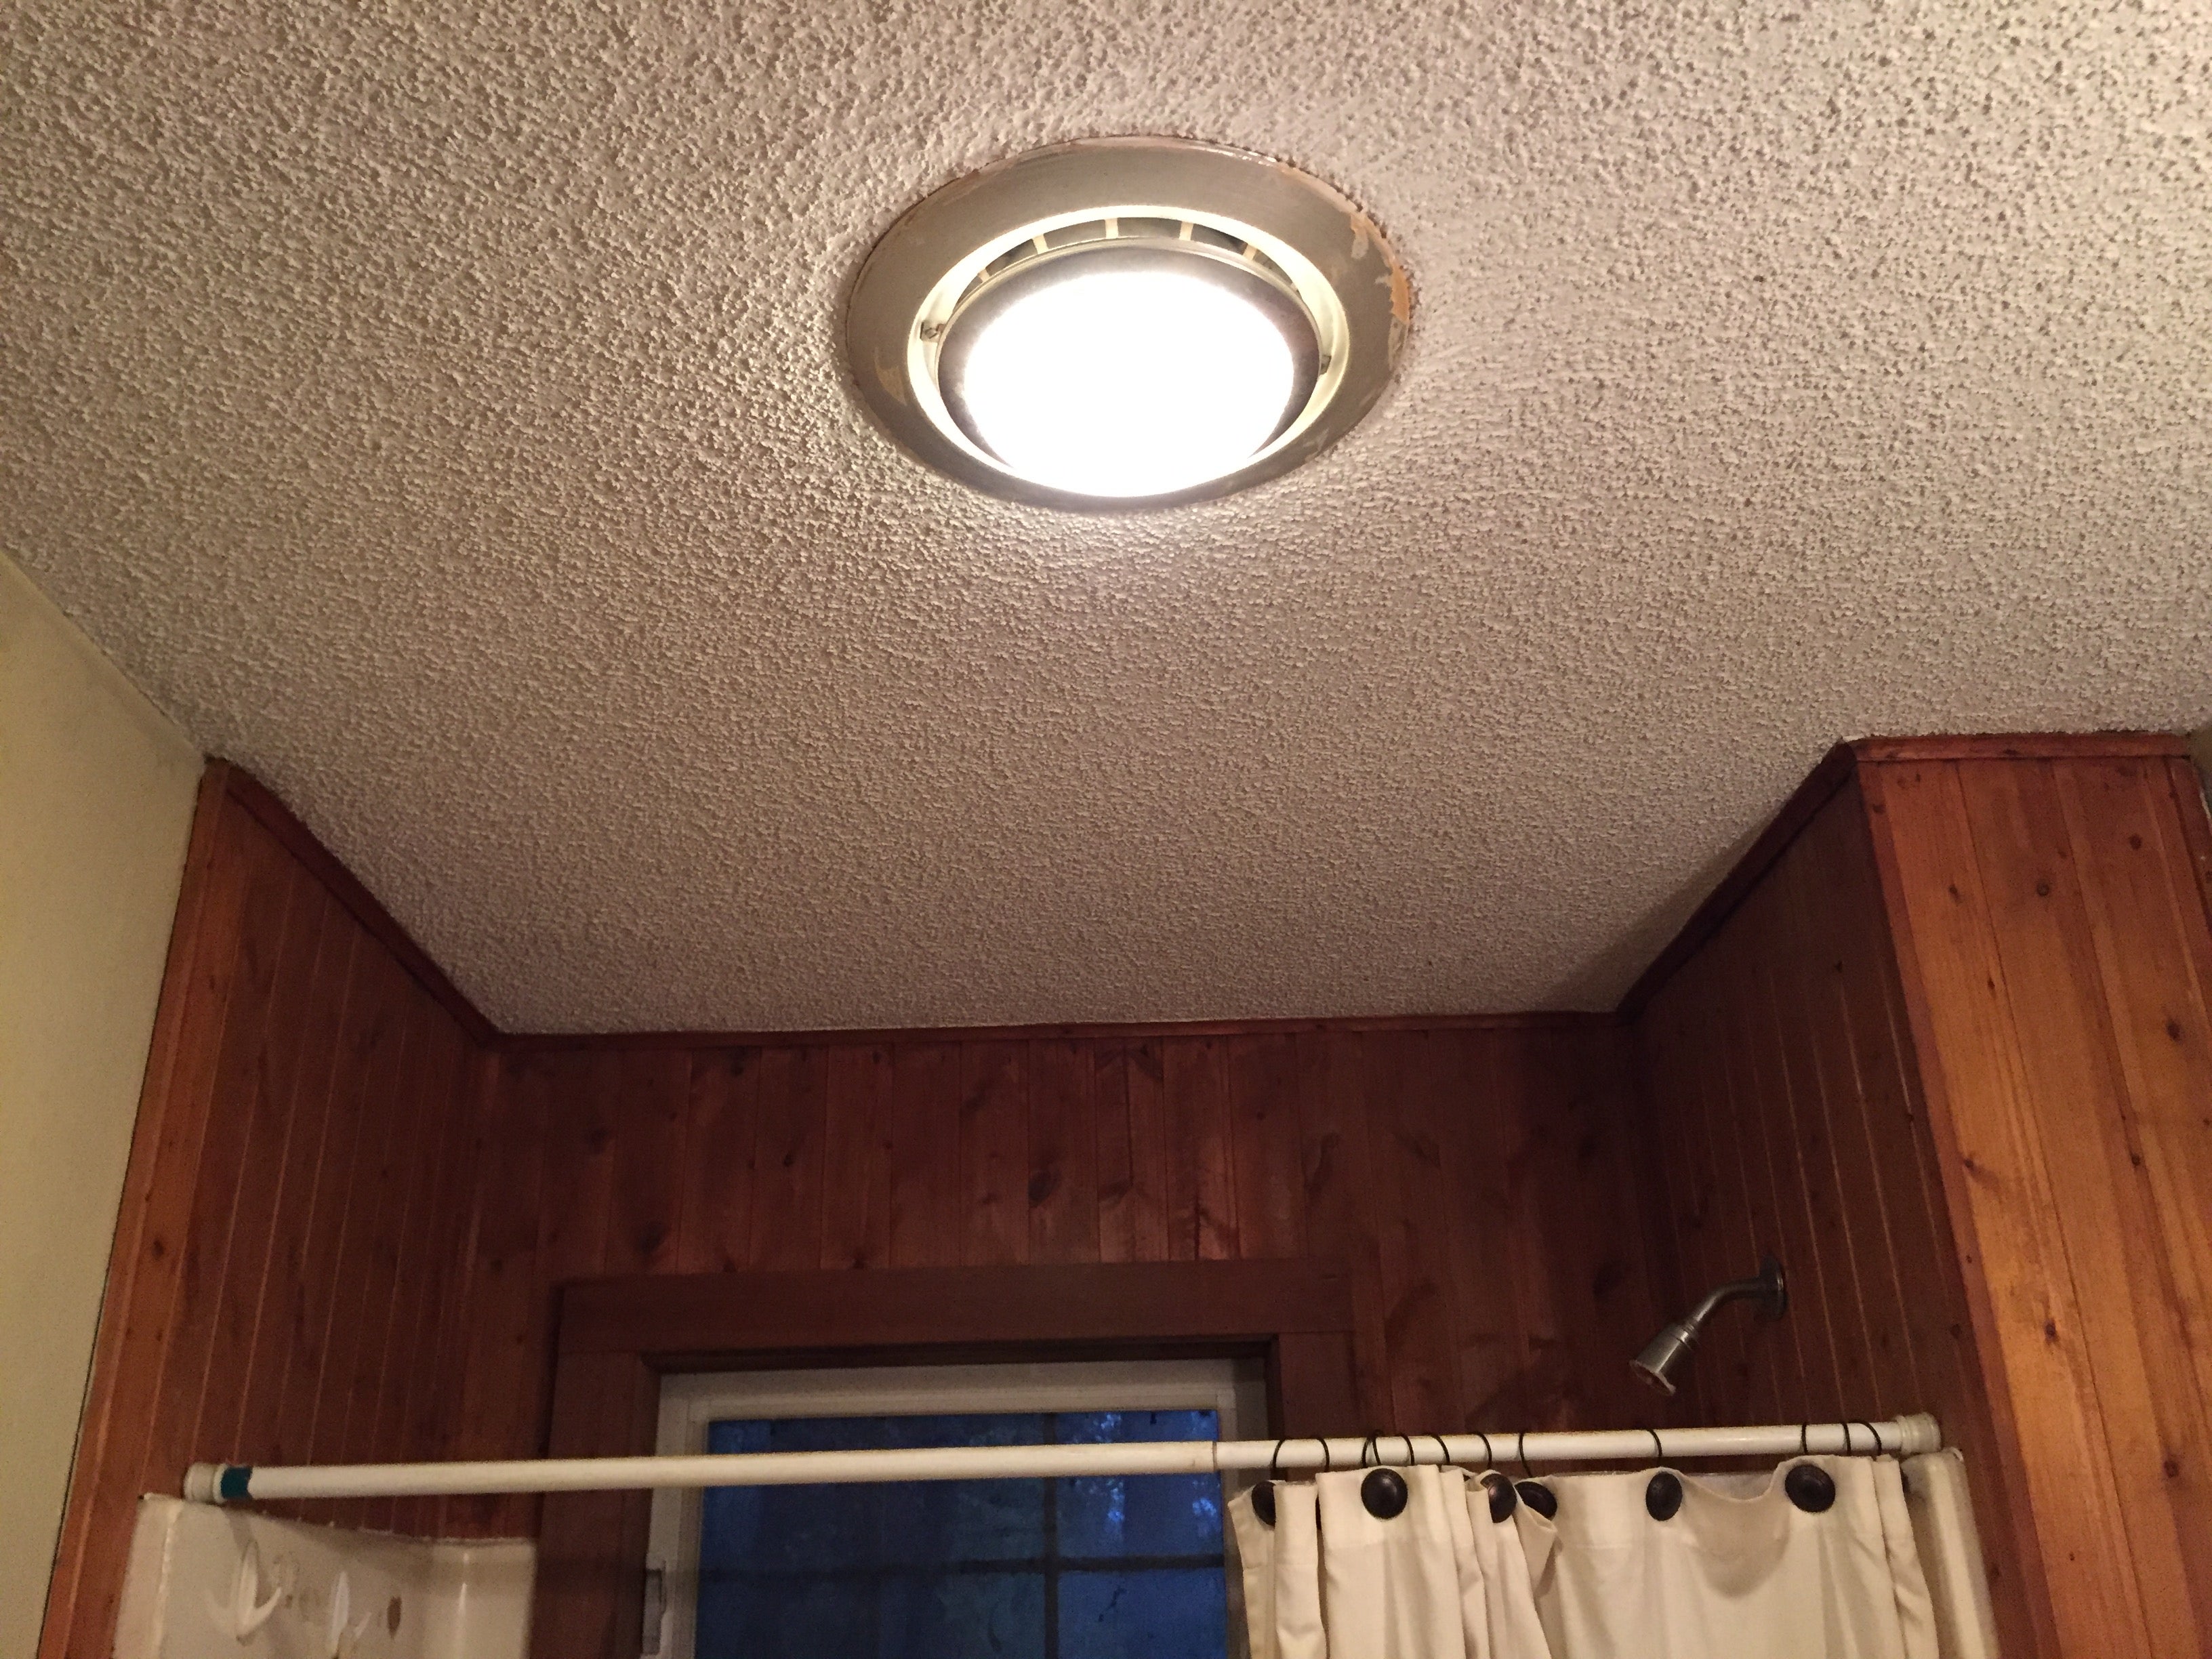
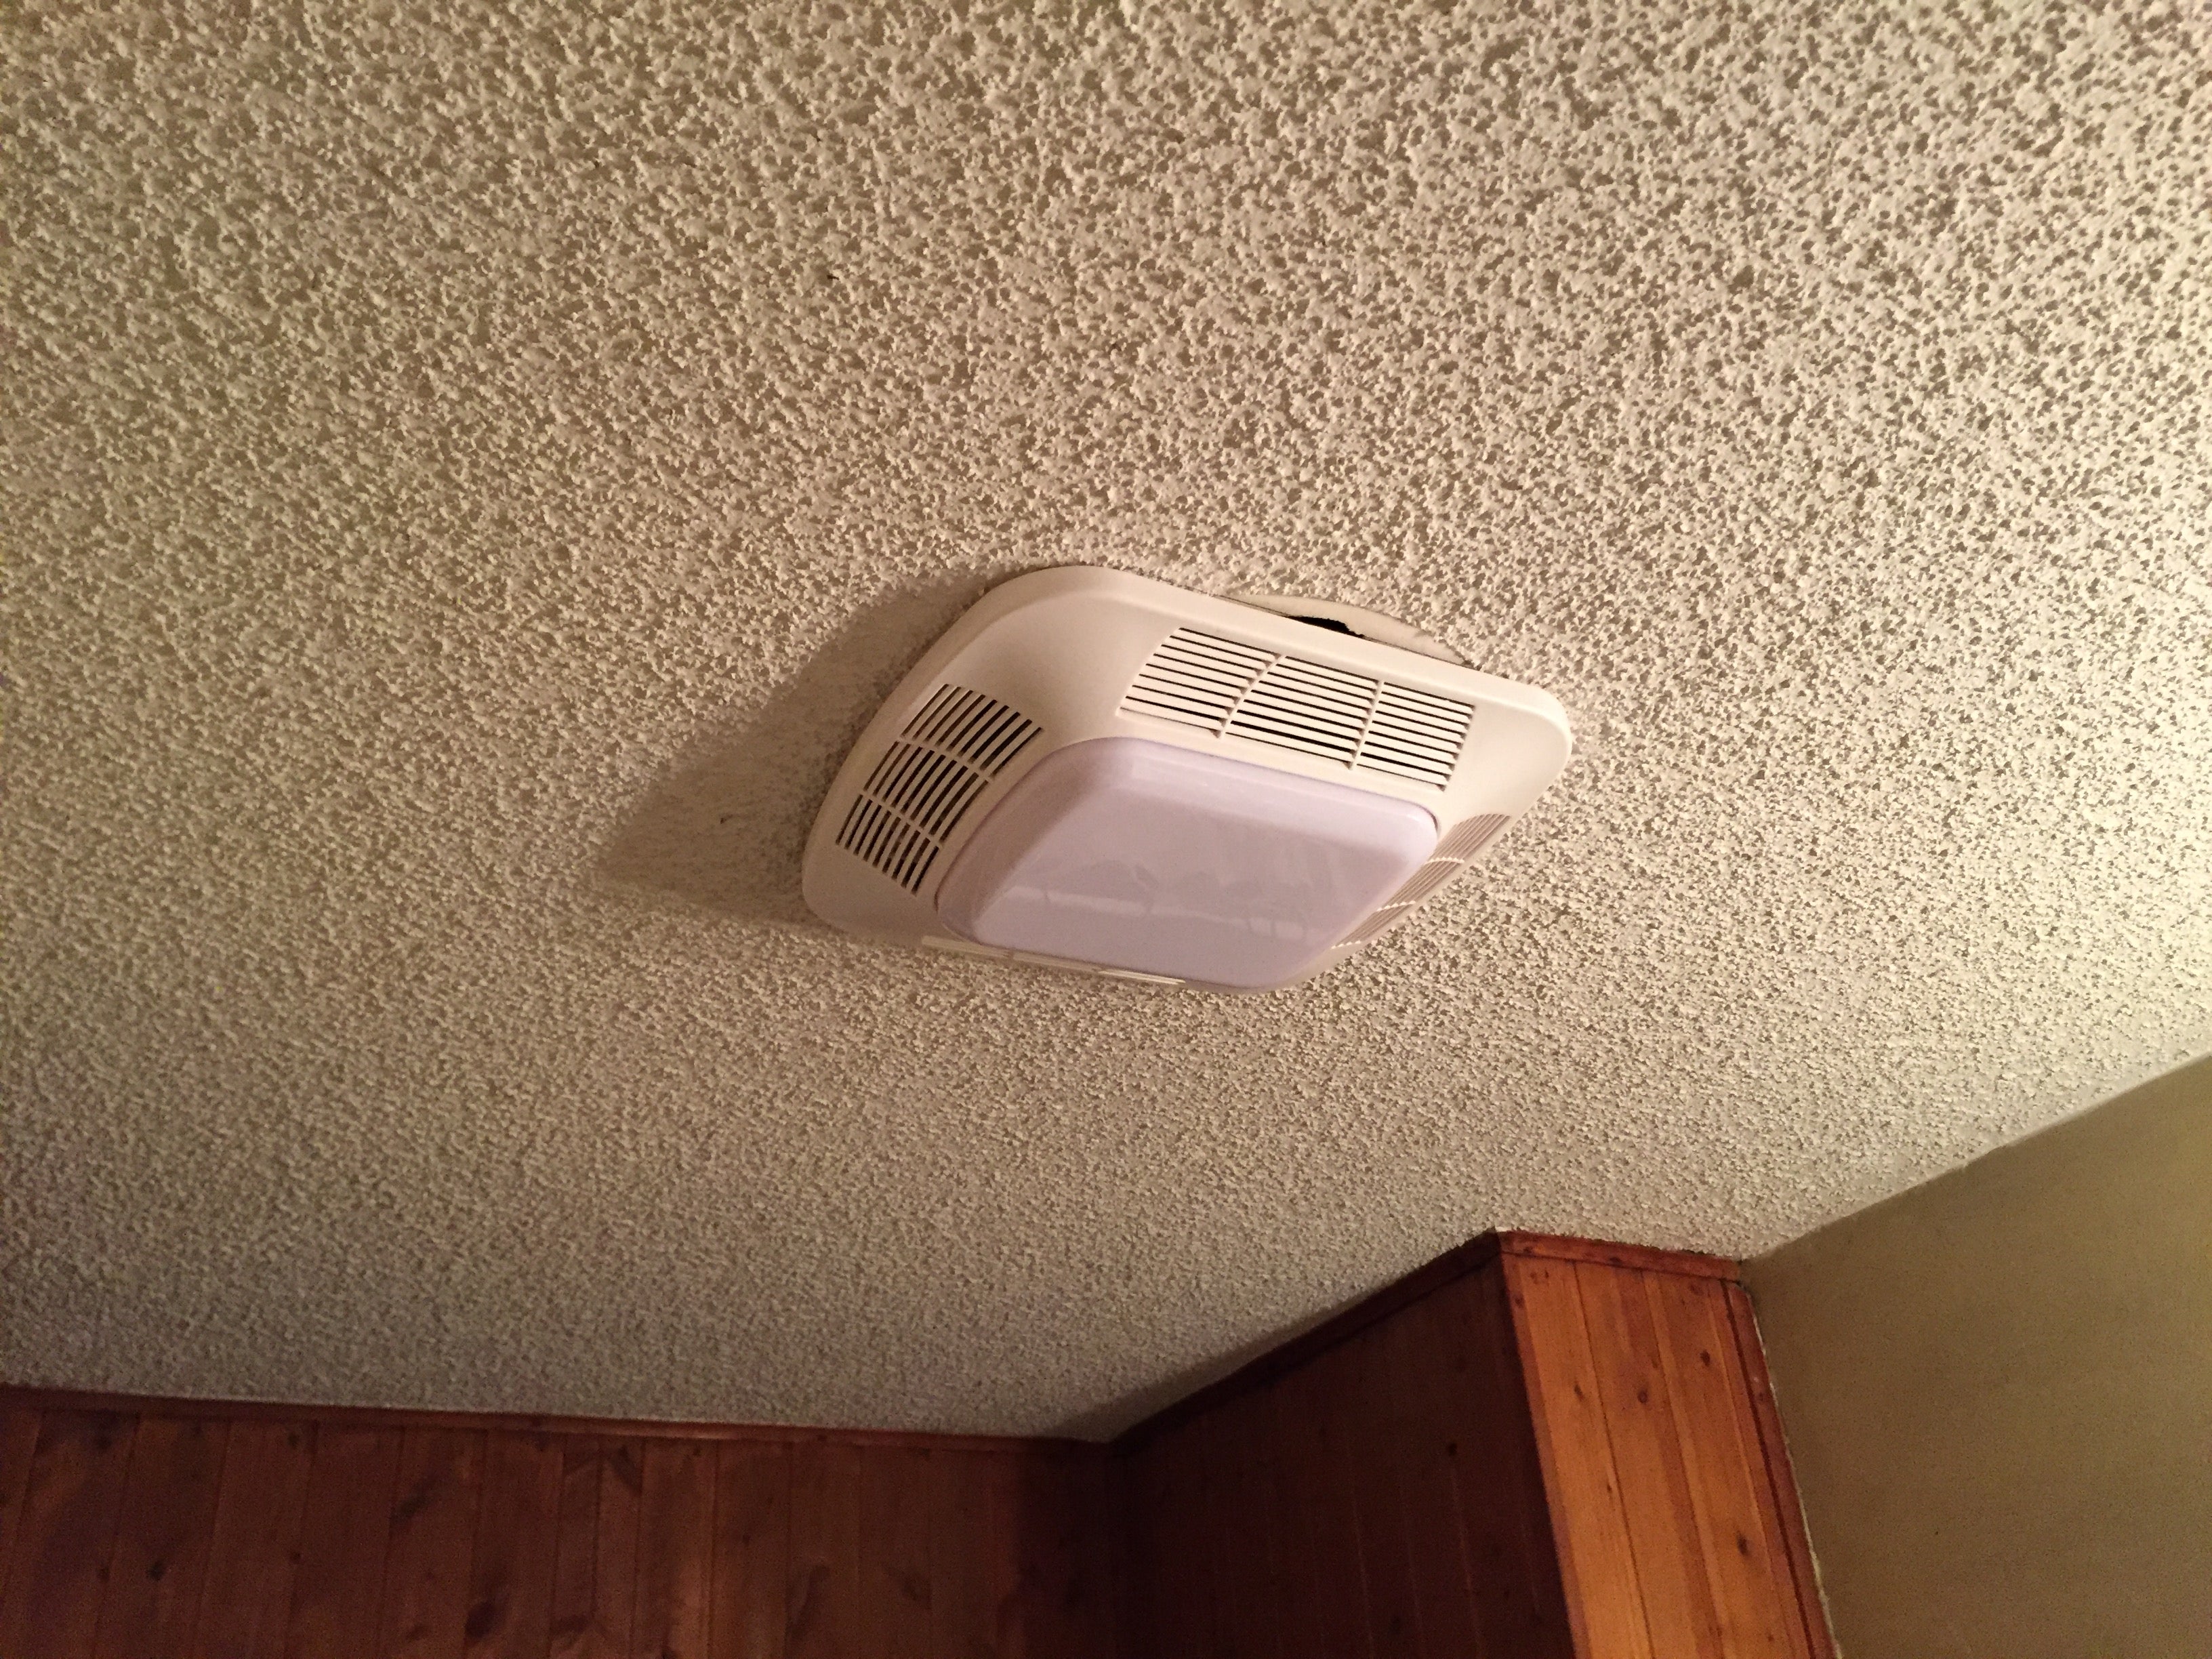
This is as the original fixture. The fan unit was so old that new ones were no longer made, so online prices naturally started at $80. I could buy a new fan for that price, which is what I did. The ceiling cutout was originally 11” in diameter, which limits what I can replace it with. So I settle for the one with the leading pic. It was actually pricey at $120, but the ceiling cutout for the new unit was suppose to be 10 5/8” x 11 1/2”, which I figured I could make work.
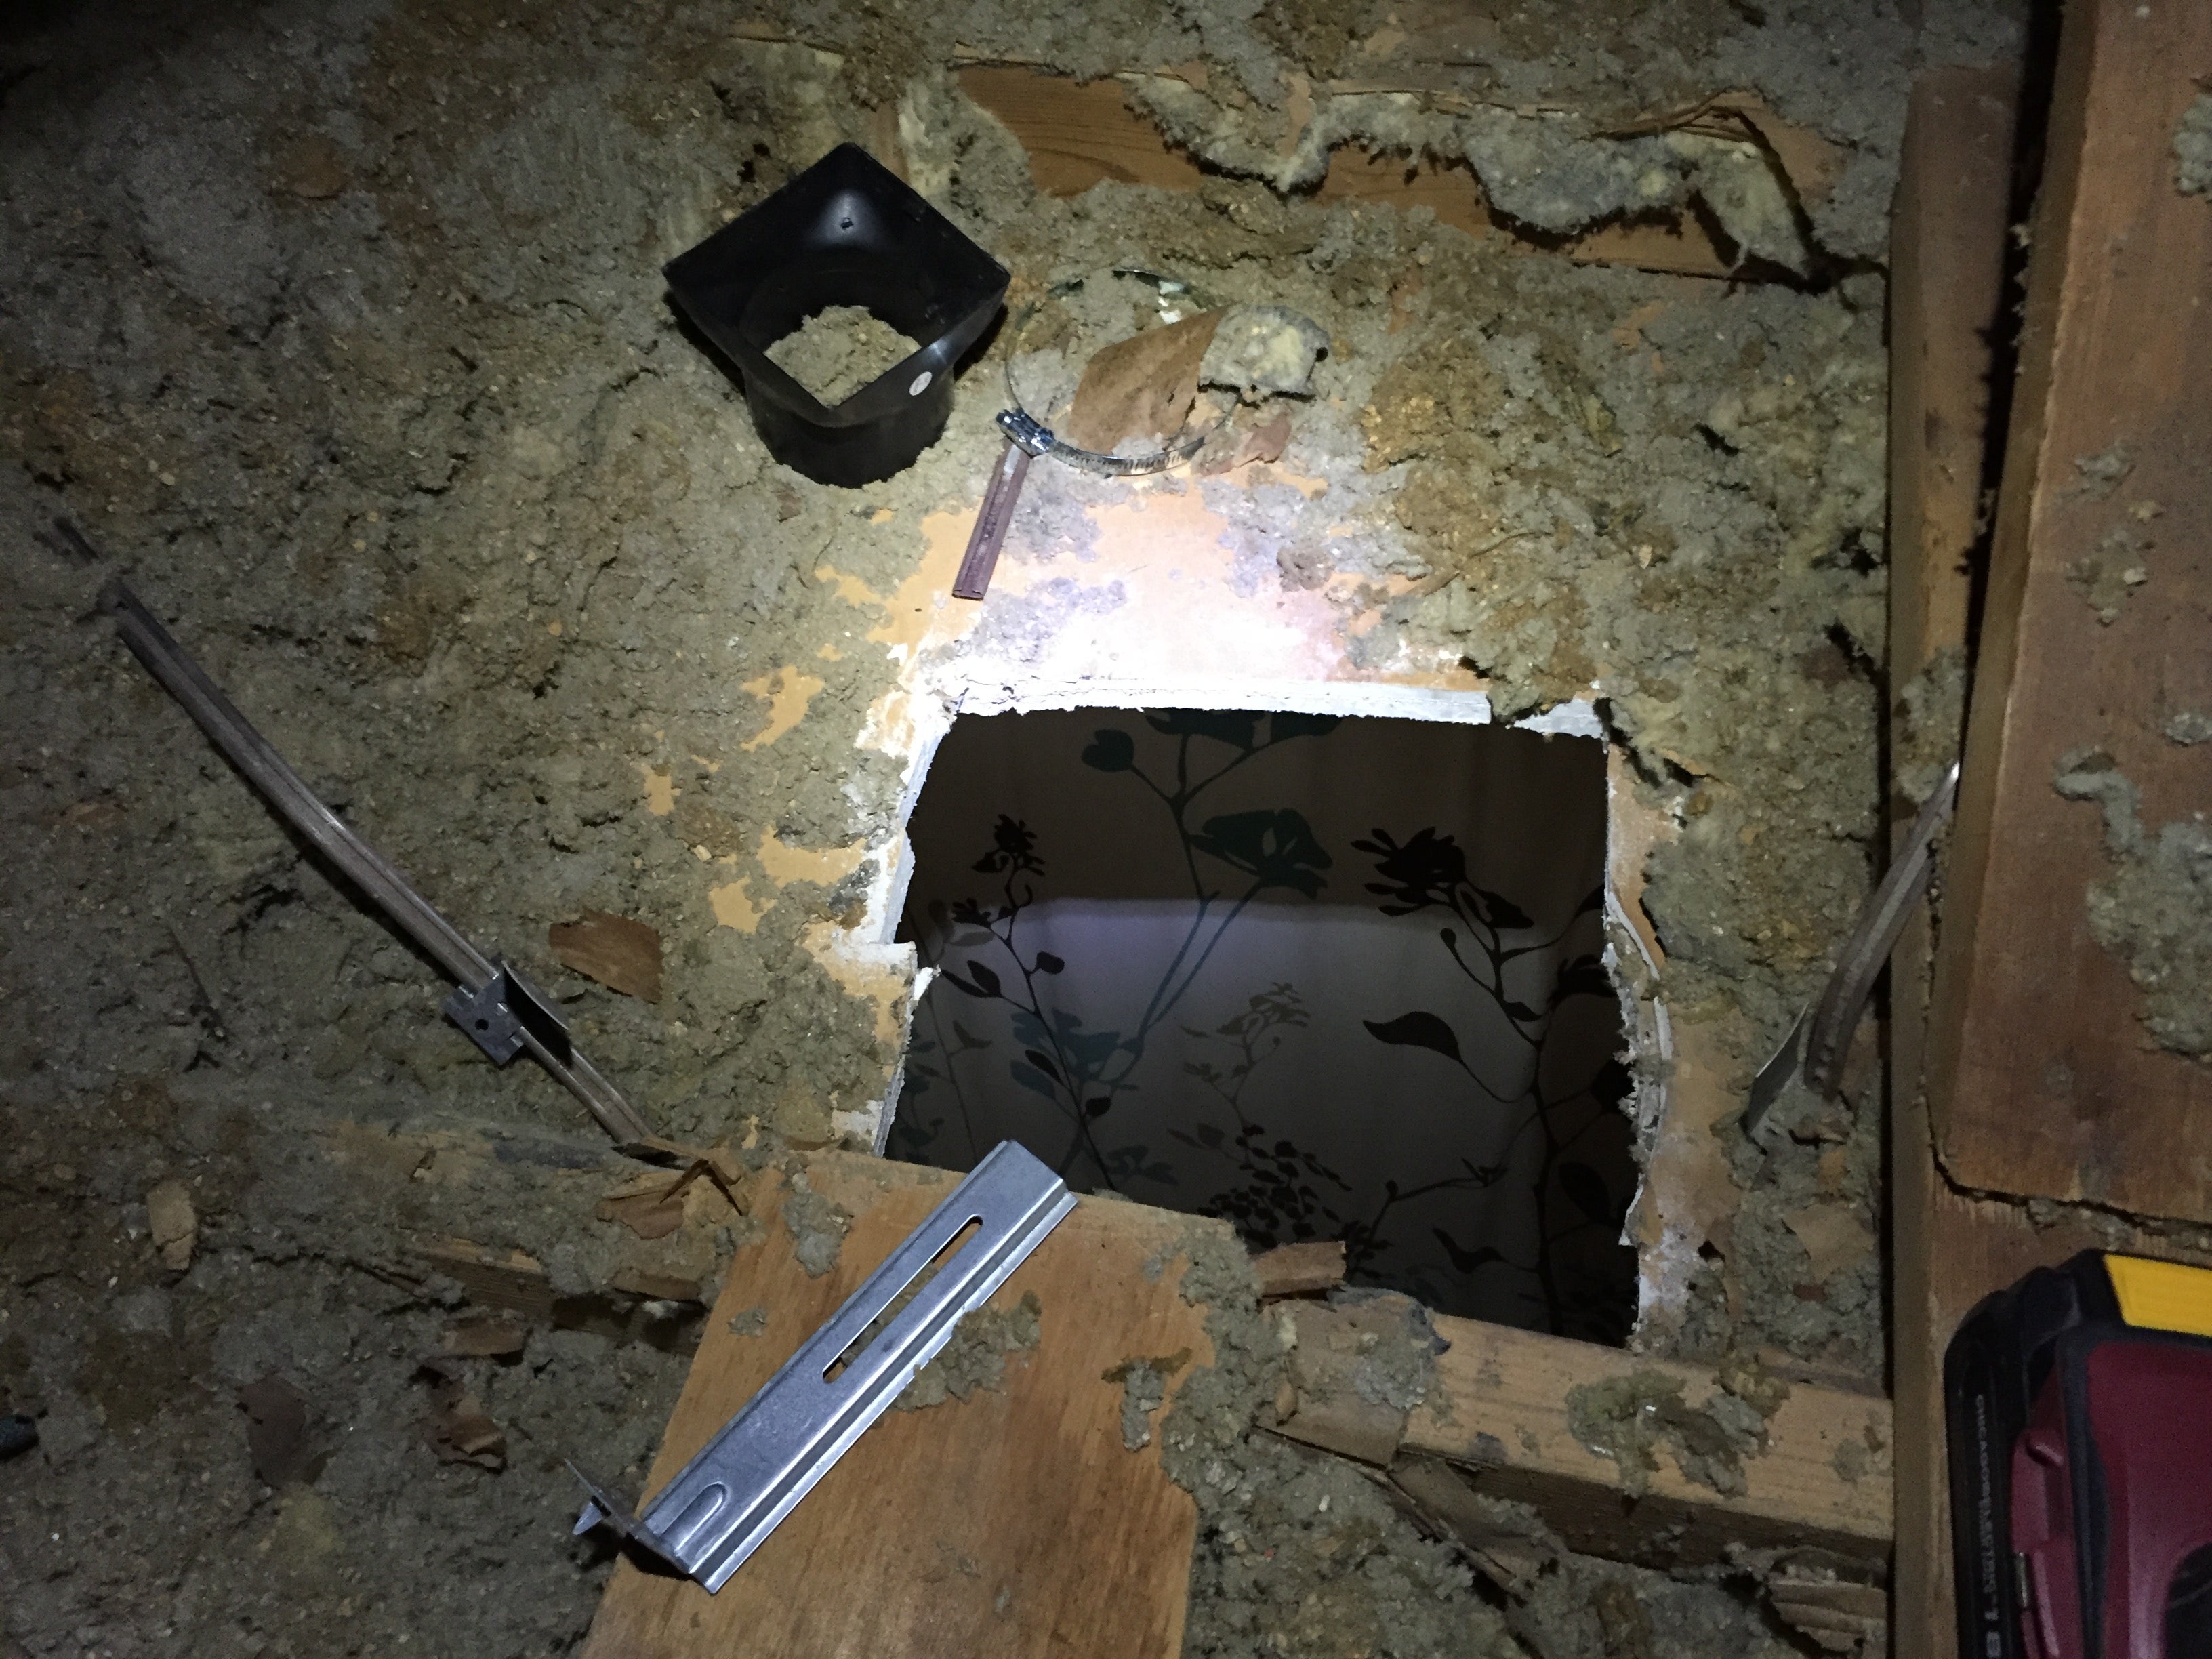
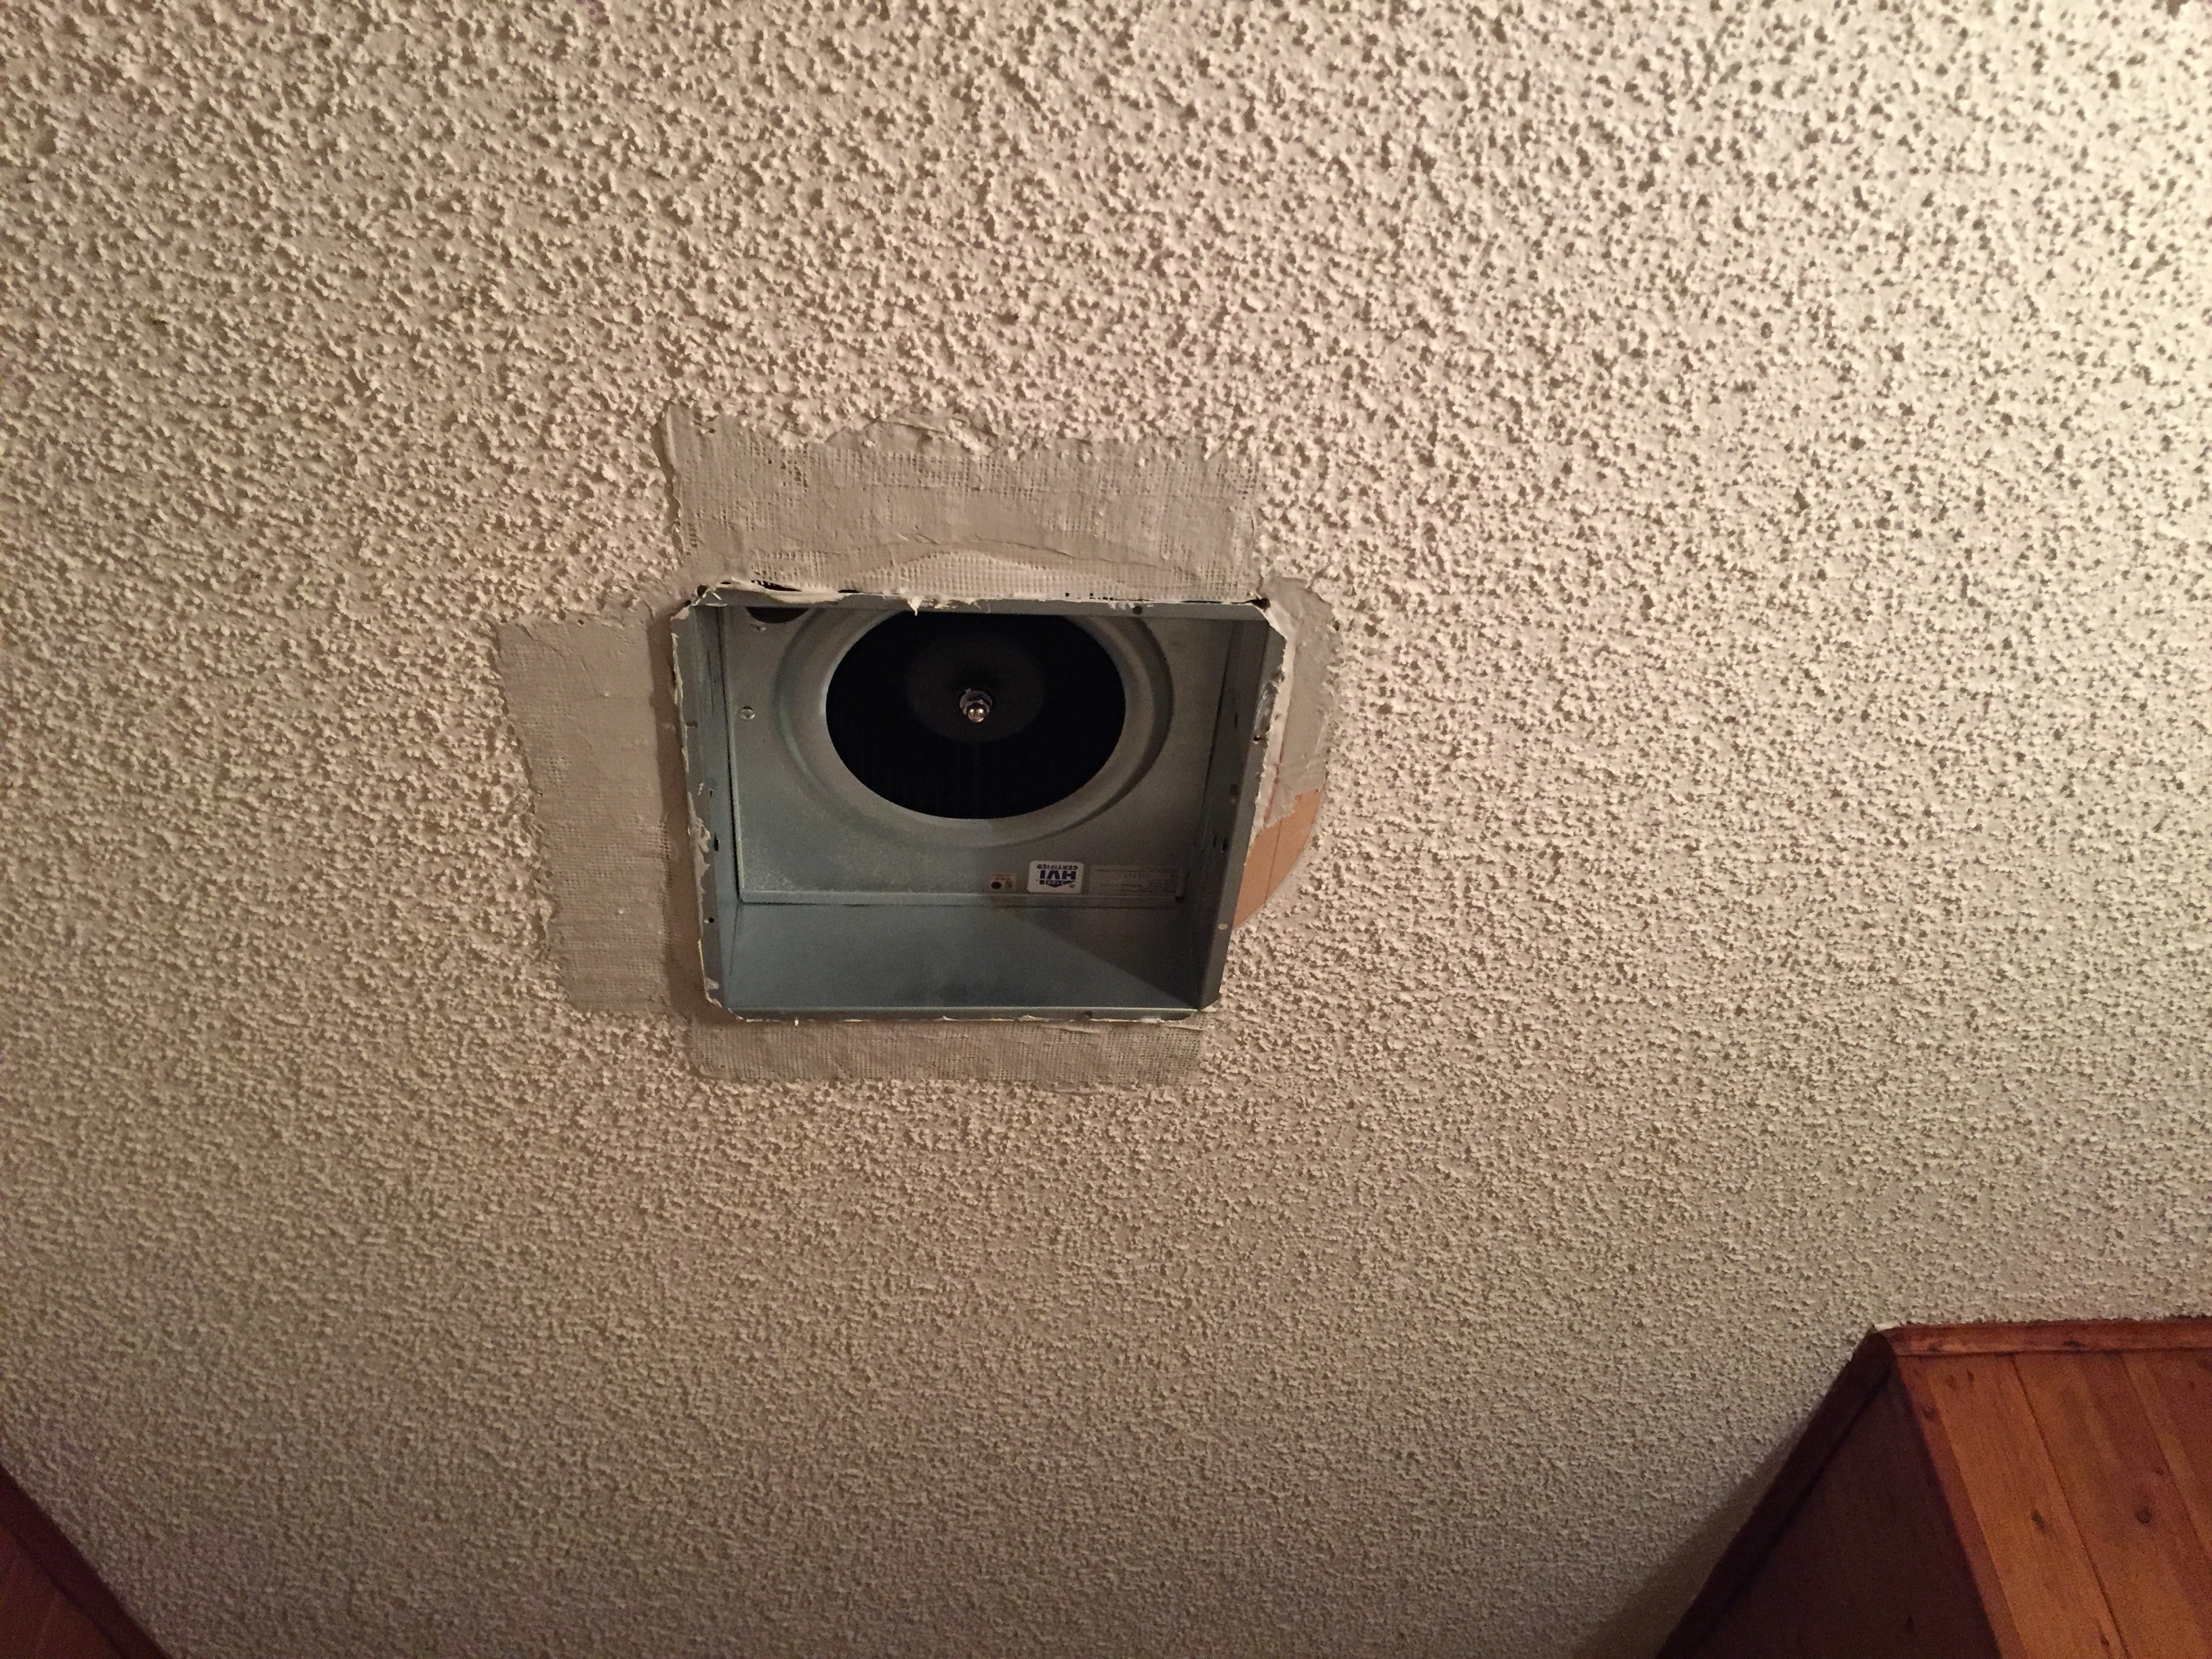
So the instructions that stated to make the 10 5/8” x 12 1/2” hole for the fan unit...it lied. It wouldn’t fit. It had to keep trimming open the hole until the unit finally had enough room. This came back to bite me later on. Also, now would be a good time to mention this is my first time doing this...ever...
Some attic pics with my awesome discolored blown insulation.
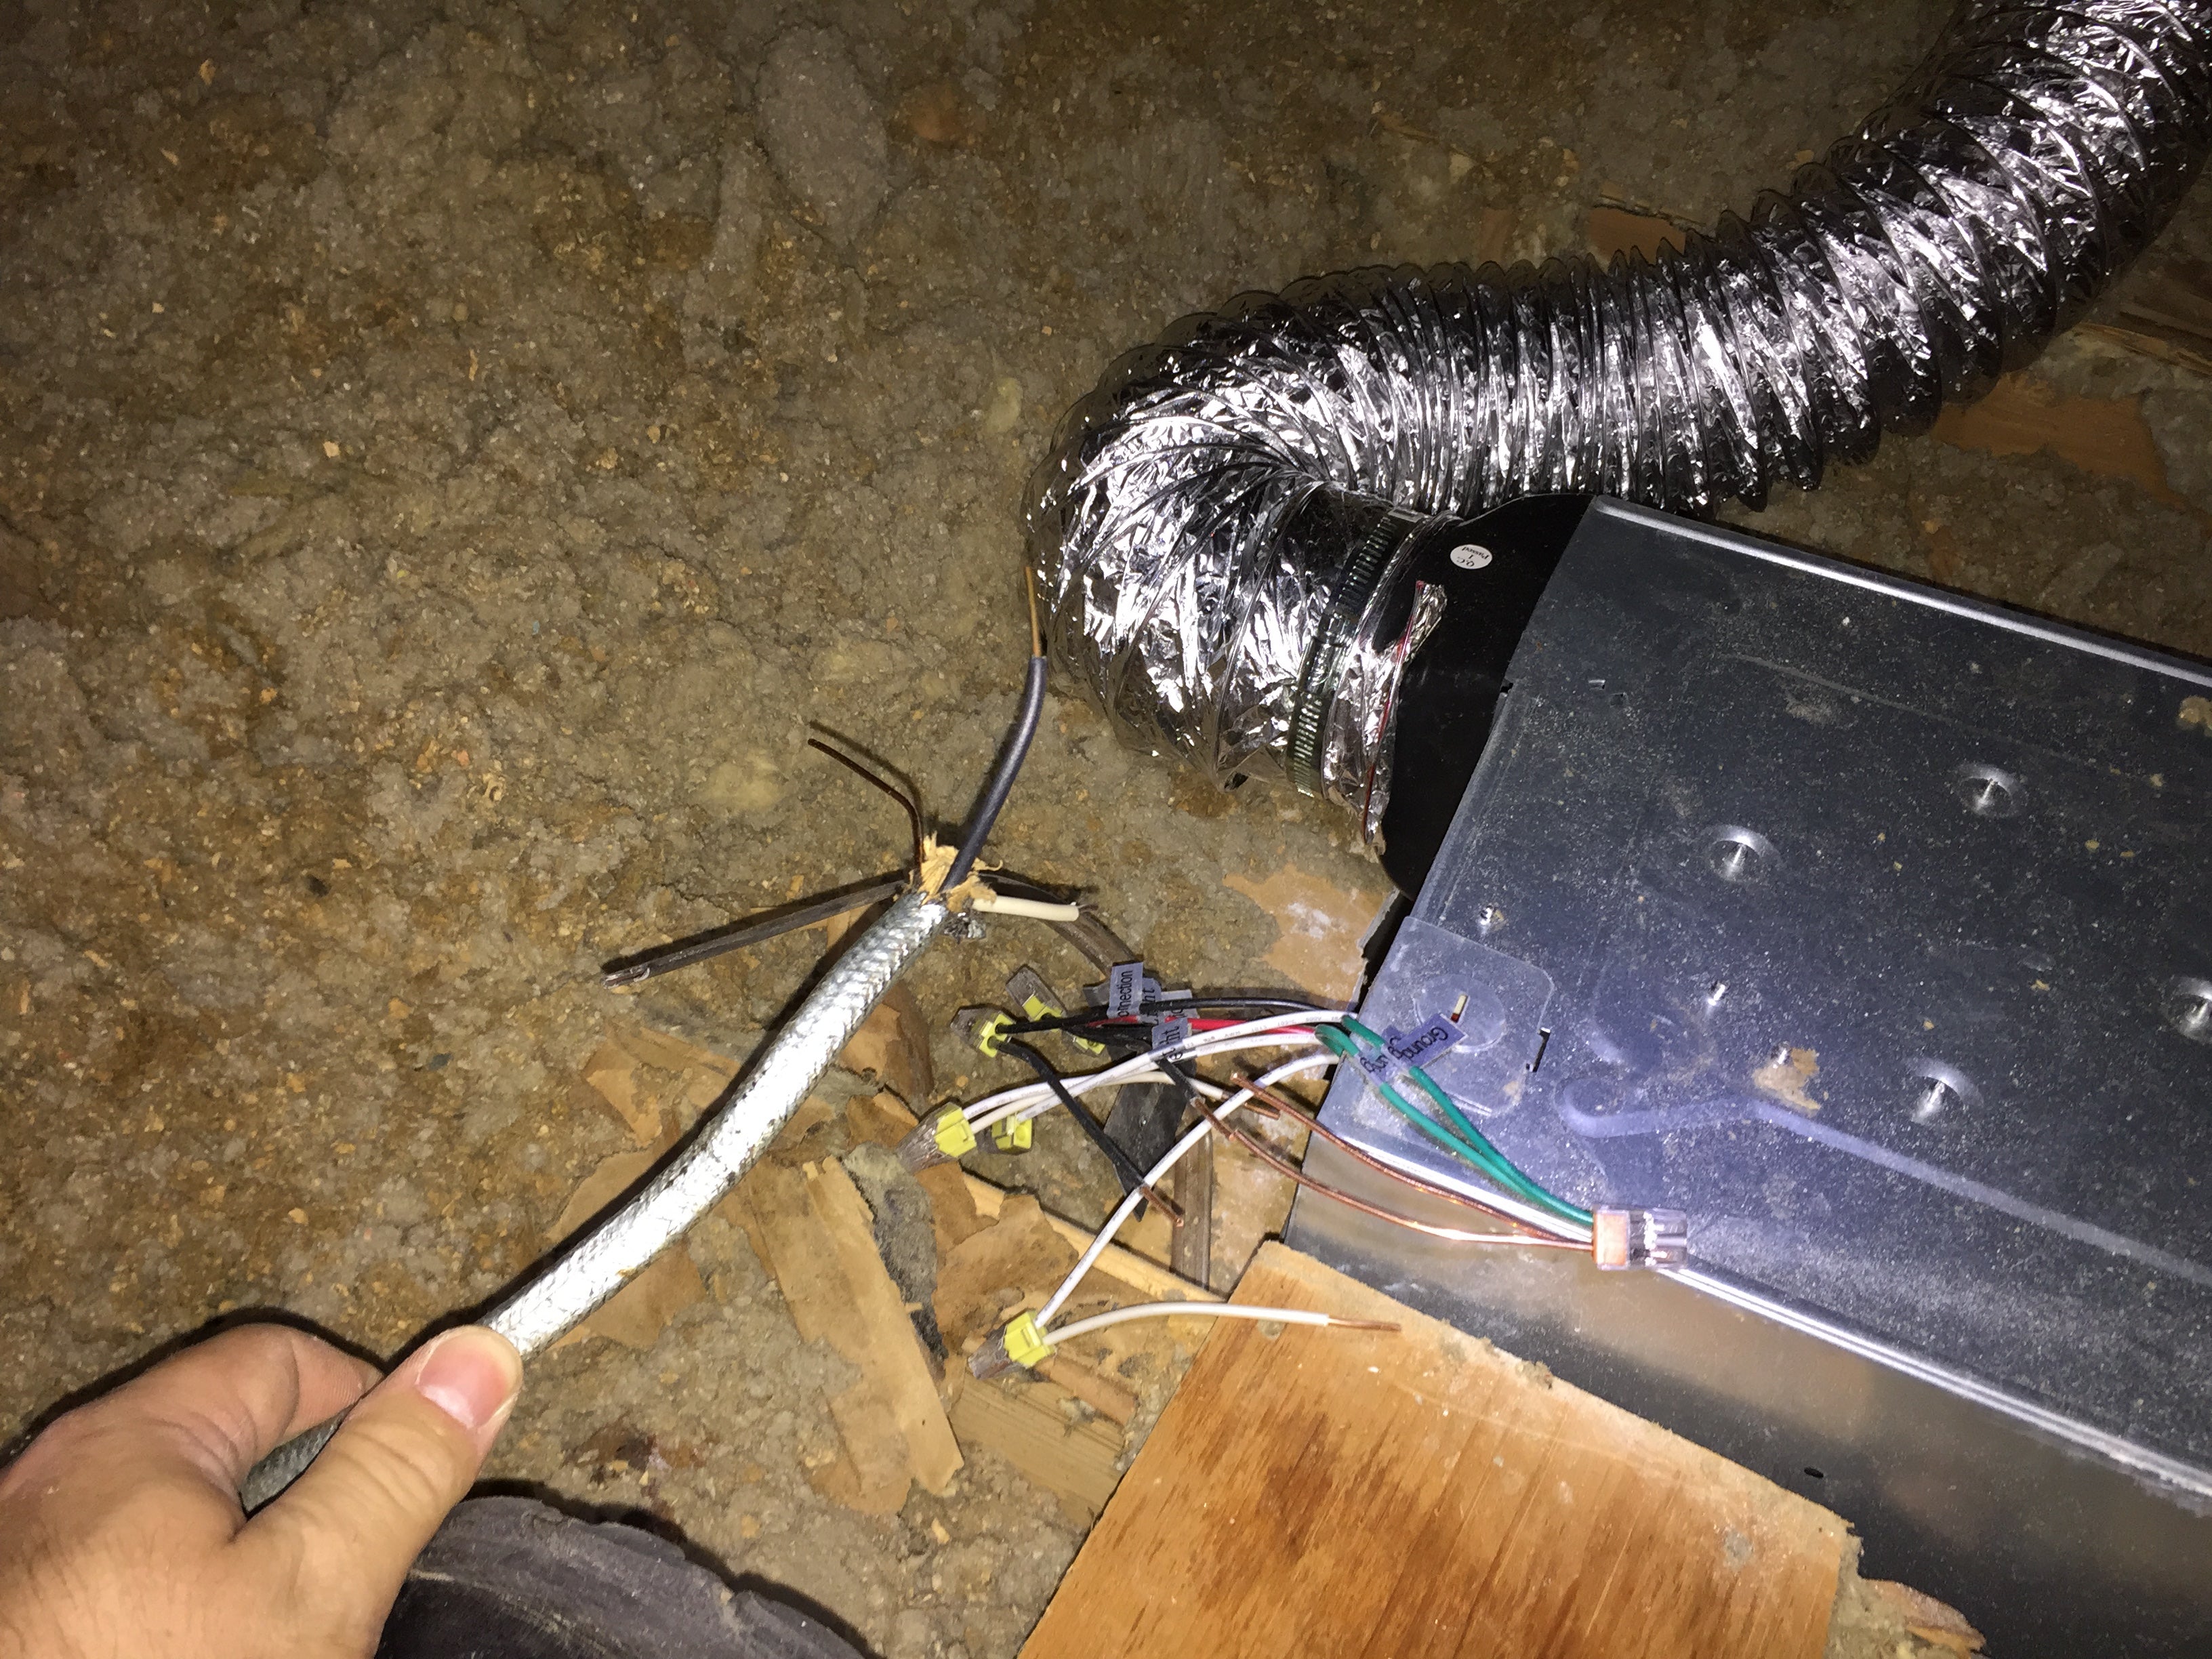
When I finally got the fan unit in, I had to hook up the electrical stuff. This was the easiest part, since I was actually prepared for this segment. The unit had a fan, a light, and a nightlight; all with their own wires. So I combined the fan and light wires into one switch, since that’s all I had to work with.
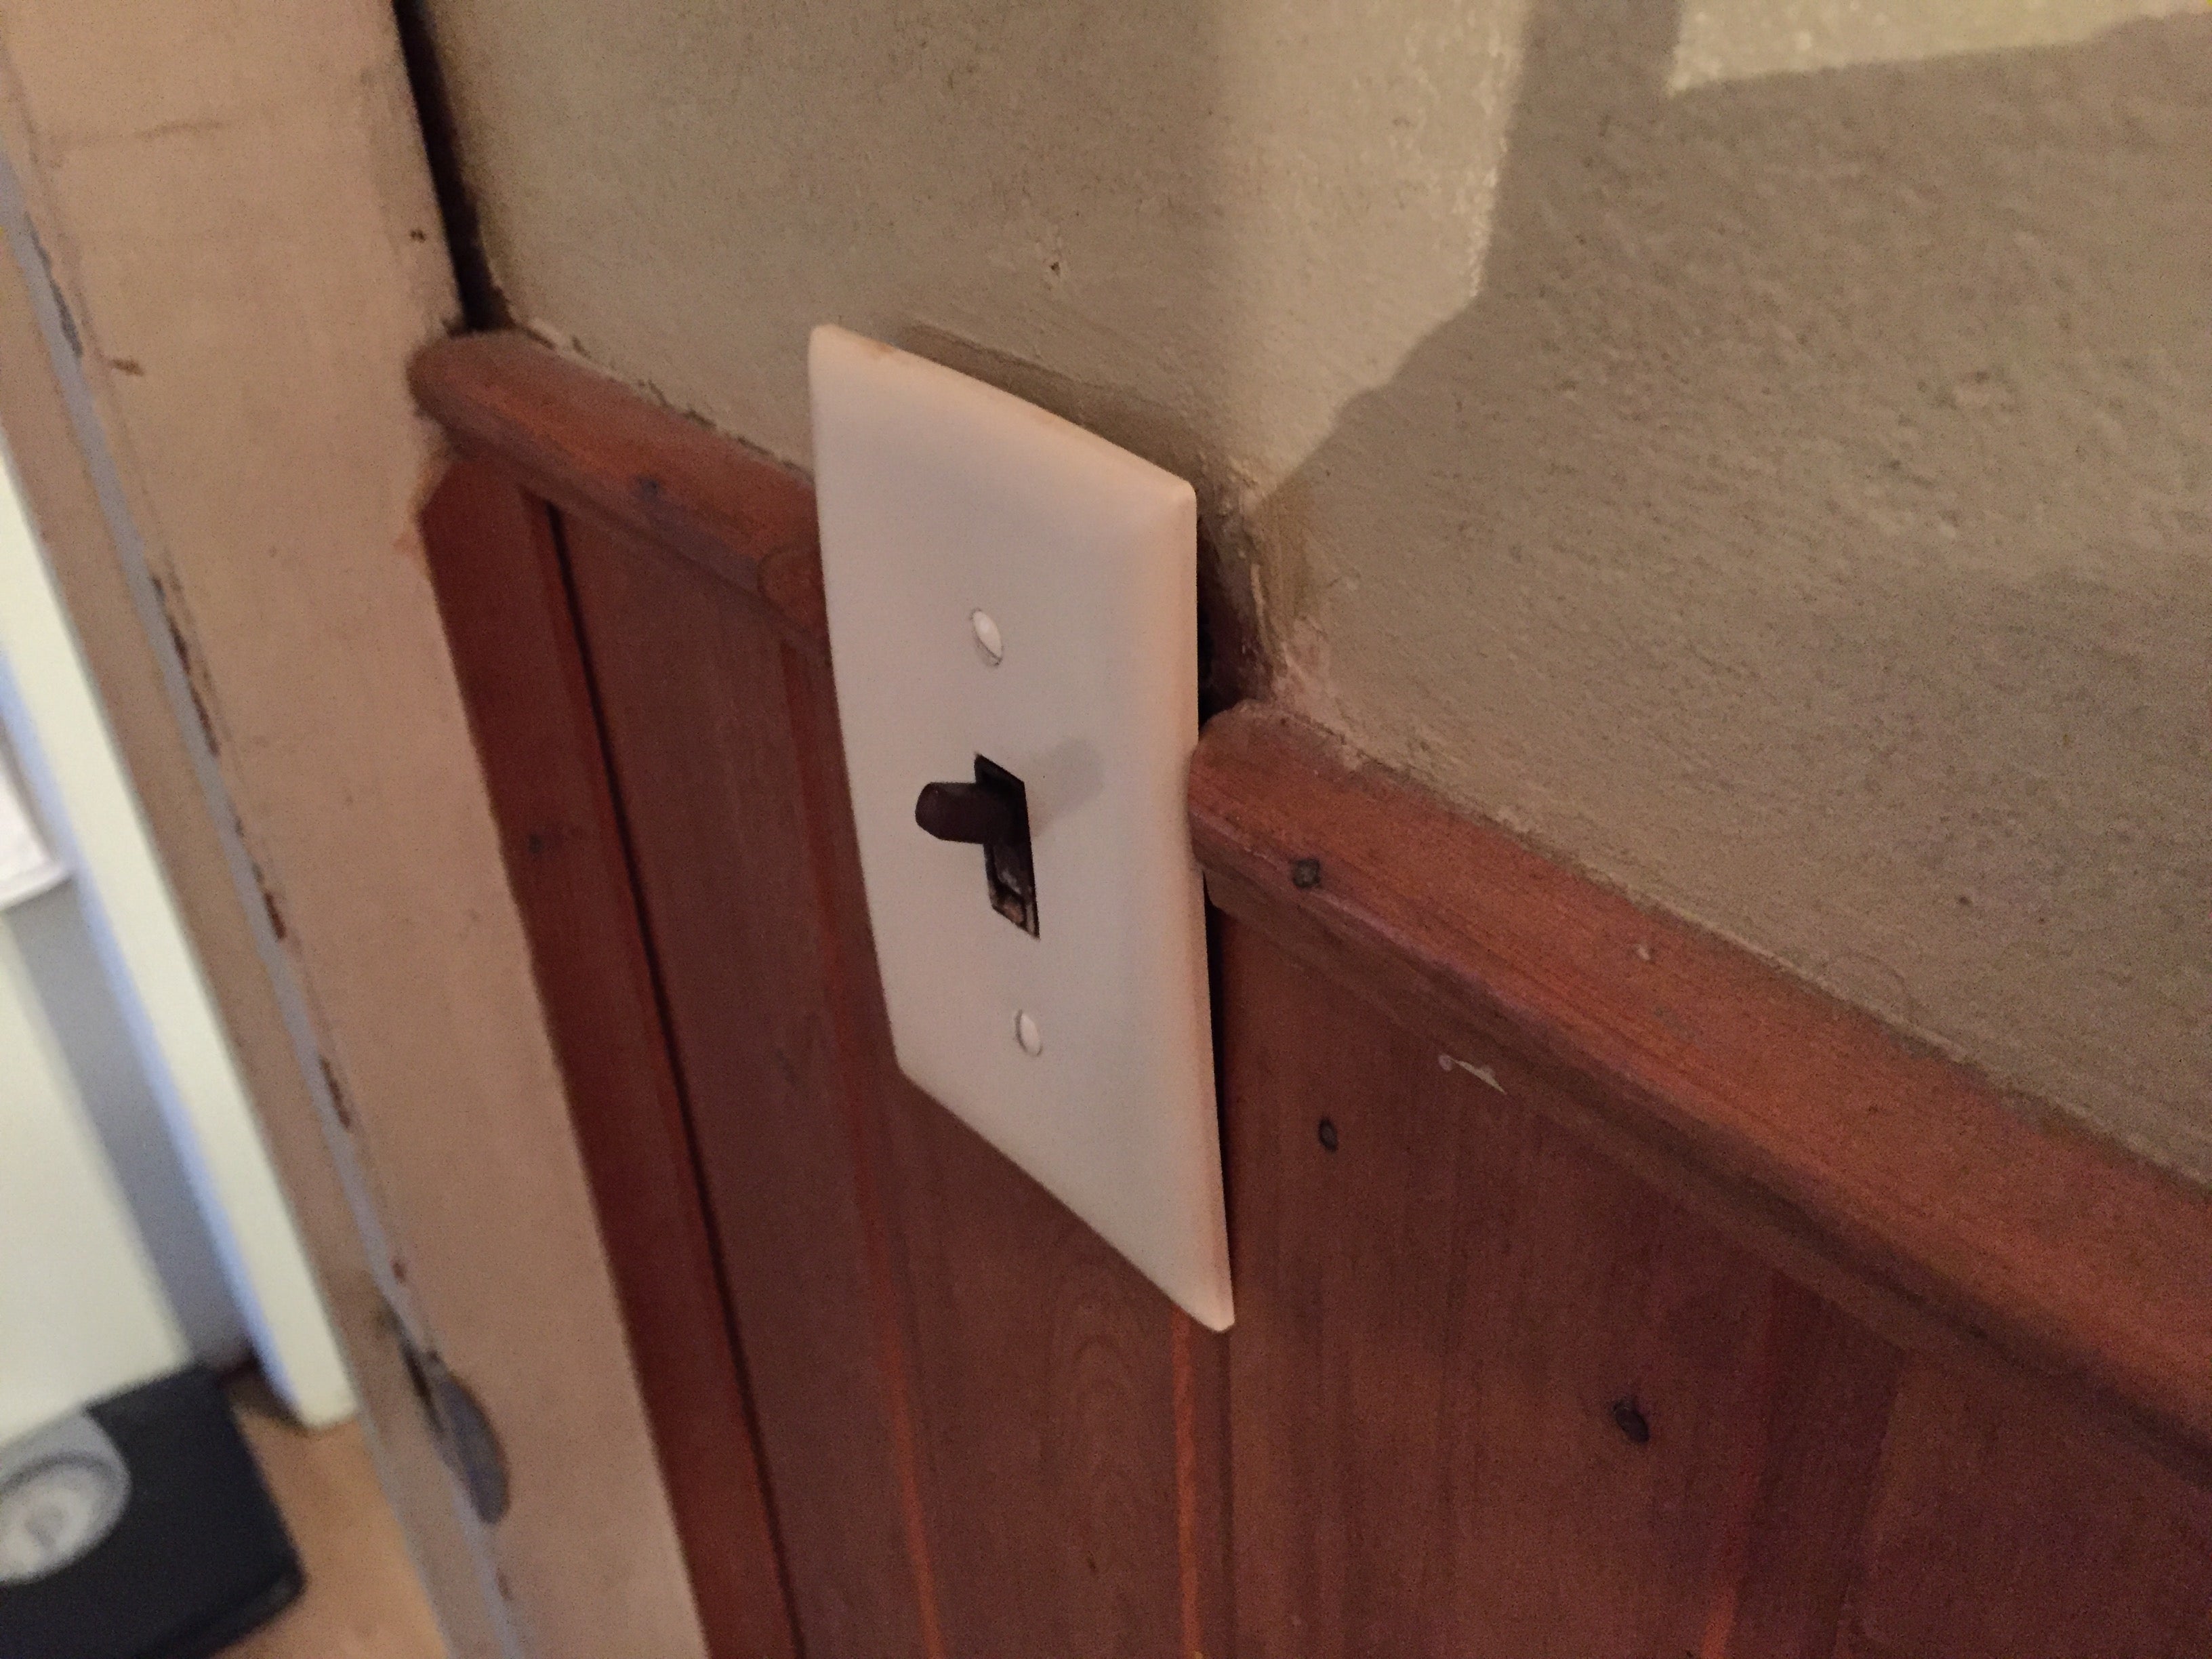
Pictured below is the sole light switch for this unit. I plan on putting some trim around it later.
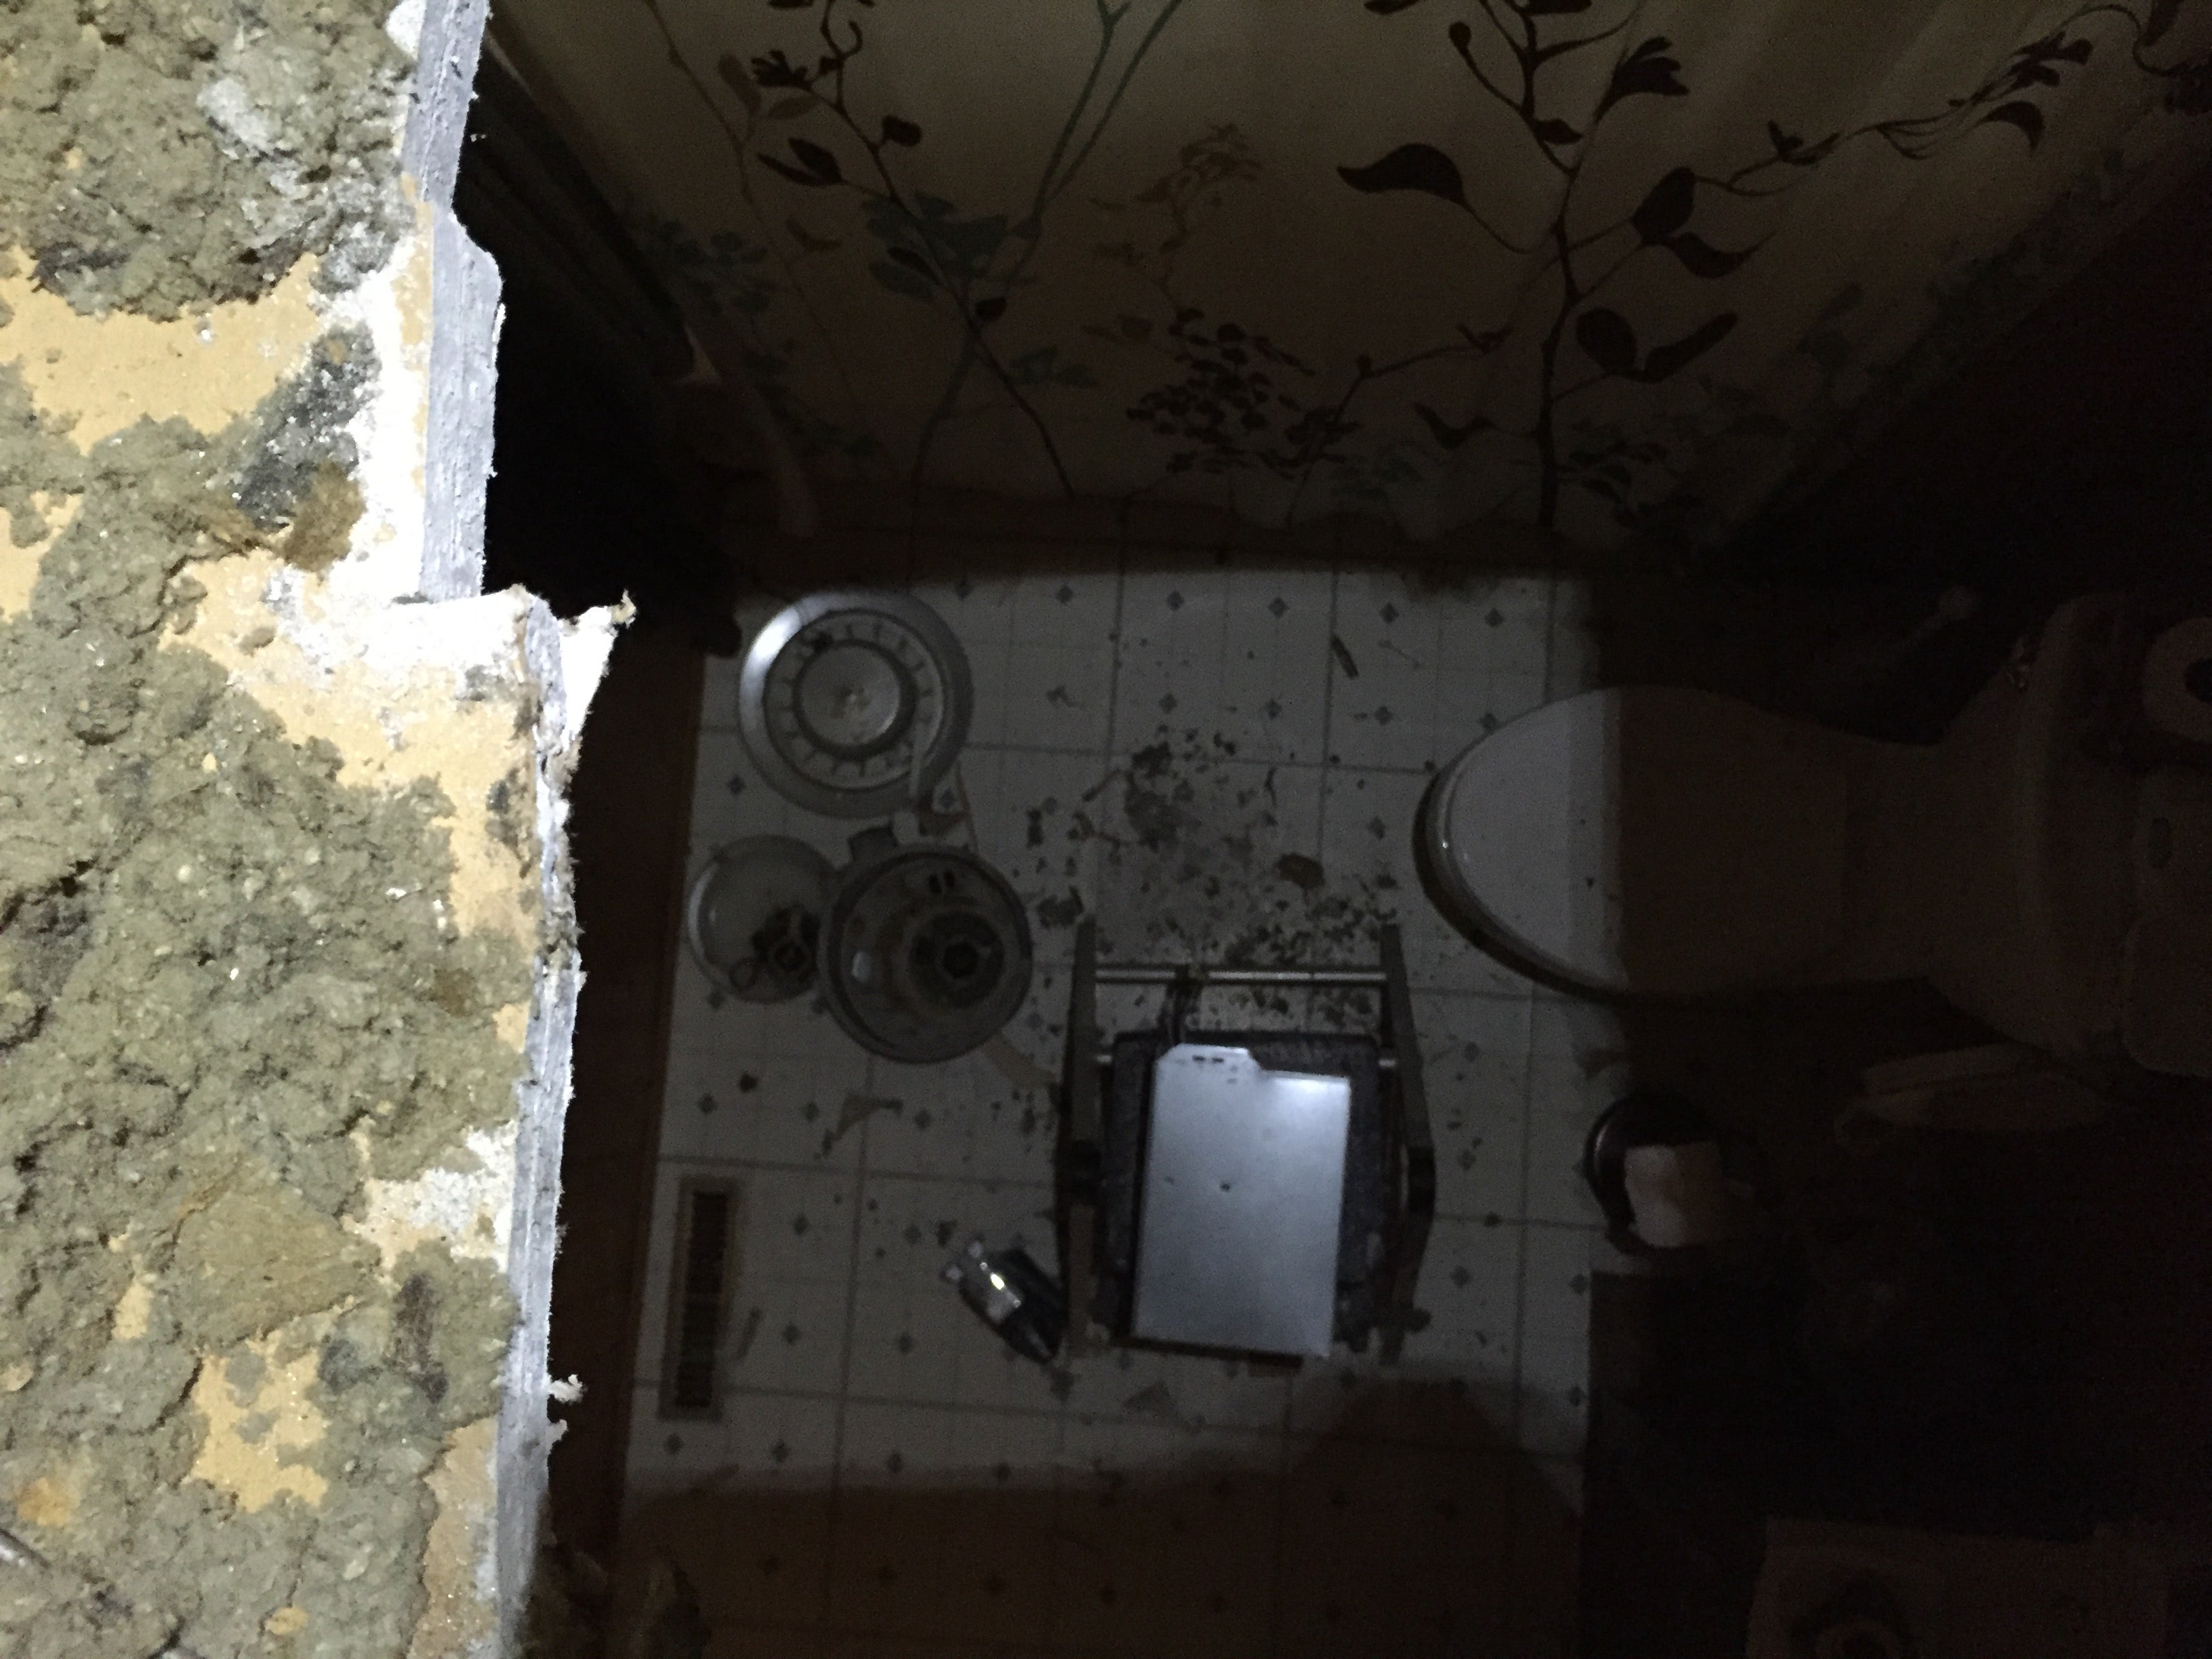
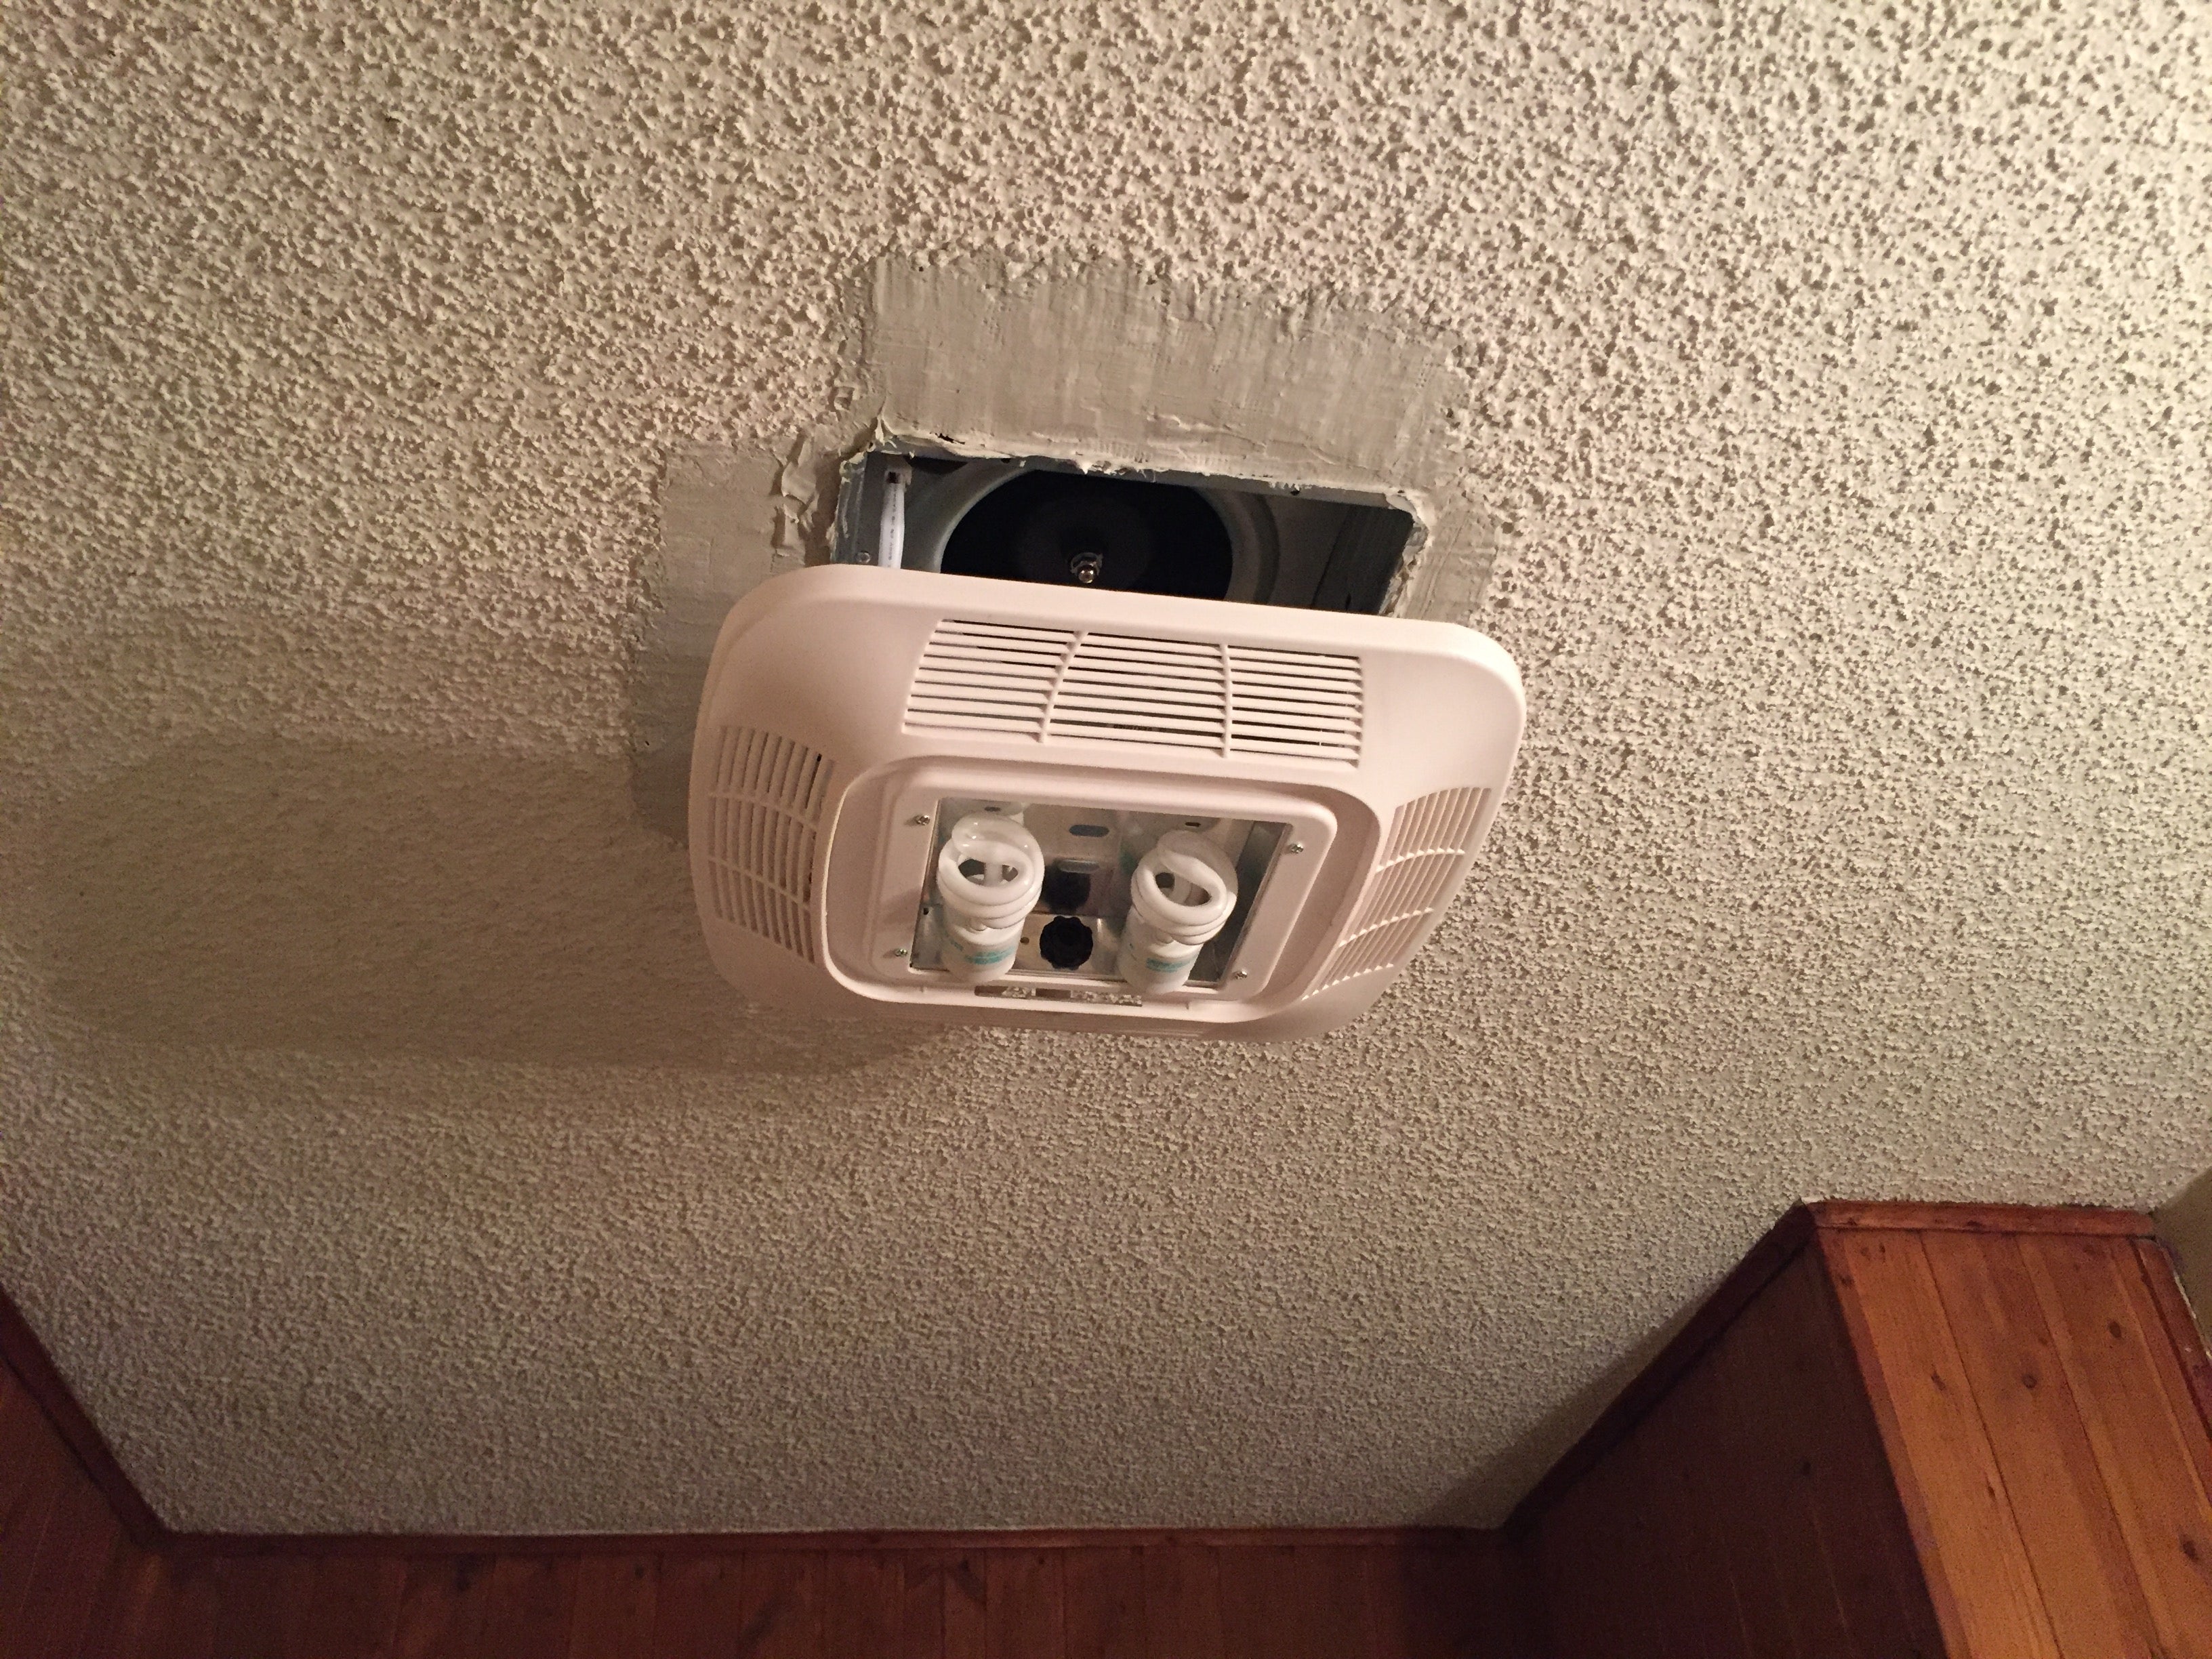
Last Saturday I got everything in and working, except....it was really windy that day, and the wind got into the attic, and I’m not even exaggerating with this next line, the blown insulation was physically being blown into the house through the larger cutout opening I had made. I apparently don’t have a pic of it, but all four sides of the unit had some extra space between the unit and the ceiling. Here’s a pic with the light unit attached, and you can sort of see what I mean.
Anyways, back to the drawing board. I was forced to make the new problem go away. So after trying various ideas, I settled with spackle. Spackle on a popcorn ceiling....hmmm...I straight up told my wife “function over fashion”.
This pic is with the 2nd layer of spackle.
In conclusion, this job wasn’t too difficult, it just dragged on for too long for me. On my own (and my reluctant wife who just helped put the unit into the ceiling), it took me most of Saturday for installation, then that night I did the spackle, waited 24 hrs for it to dry, Sunday night did spackle again, waited another 24 hrs, and Monday night it was complete.
The most annoying part was traversing the attic because, let’s be honest here, it’s hard to get in and move around. Besides the attic part, it wasn’t too difficult, and I think anyway can do it if they put their mind to it.
What I desire next is to go back and add another Romex line (or two) so I can operate the fan and light (and possible the night light if desired) separately. Right now the fan and light are on the same switch, which I feel just wastes electricity. Of course, I plan on doing this without cutting into the wall, so I’ll have to preplan my method of attack.
Anyways, thanks for reading. I enjoy making these Houselopnik posts because 1. I get excited when I accomplished something new, and I really like to share my experience, and 2. Telling other people it’s not that hard to do and to inspire them. Plus, if you can learn from my mistakes, why not?
 Mattbob
> zeontestpilot
Mattbob
> zeontestpilot
10/27/2015 at 08:32 |
|
“Of course, I plan on doing this without cutting into the wall, so I’ll have to preplan my method of attack.” I hope you have a fishtape. Also I feel your pain, I did 2 bathroom fans for my parents last year. Luckily they didn’t have popcorn ceilings, so I just cut out a large section of drywall, and put a new section in that had a perfect cutout for the new fan. That way I was able to do everything from underneath while the drywall section was out. It was more work technically than doing it from above, but less frustration, and less dealing with all the fiberglass insulation above.
 TheRealBicycleBuck
> zeontestpilot
TheRealBicycleBuck
> zeontestpilot
10/27/2015 at 08:47 |
|
Homelopnik should be a kinja. Here’s a suggestion for you to wrap it up.
|
zeontestpilot
> Mattbob
10/27/2015 at 09:32 |
|
I talked to my grandpa, the electrician, last night. I have an idea of what to do, but like I said, I need to preplan. Sometime this week, I need to draw a diagram of the switch, then what it needs to be changed to.
I also have to replace the fan for the downstairs bathroom. But oddly enough, it doesn’t seem to actually vent out of the house, which needs to change IMO...
|
zeontestpilot
> TheRealBicycleBuck
10/27/2015 at 09:36 |
|
It should be a kinja, but I’m not sure how popular it would be. But I do have lots of homelopnik content to contribute.
Because I’m cheap, and I hate the bookcases on sale nowadays because they fall apart so easily, I decided to make my own bookcase out of wood. I made some plans, all I need is the rest of the wood, and a saw to cut the wood. That’ll be an interesting project to share, because I'm doing it with no prior experience.
 Snuze: Needs another Swede
> zeontestpilot
Snuze: Needs another Swede
> zeontestpilot
10/27/2015 at 09:50 |
|
I hate these things. I used to do electrical work with my dad, and these were easily one of the worst tasks because of all the reasons you described. So, well done! You did a good job!
As for splitting the light, night light, and fan, it should be too hard provided you have the wall space to do it. First thing I’d do is take the plate off the switch and stick a screwdriver in on each side to see how much room you have on either side. If you can get a 3 gang box in there, you can do all 3. Otherwise you may need to go 2 gang with a stack switch or just reuse the single gang with a stack switch and ditch the night light.
Then alls ya gotta do is fish down the wall into the top of the box. The trick is getting the wire into the box. If you yank the old one and replace it with a 2 or 3 gang box this isn’t so base because you can work everything outside of the wall. I’ve had to add switches before to an existing gang-able box and assemble the box inside the wall. Worst. Task. Ever.
Let me know if you need any more info, but it sounds like you got some good help, with your grandpa being an electrician. Best of luck!
|
zeontestpilot
> Snuze: Needs another Swede
10/27/2015 at 10:06 |
|
Thanks for the compliment! In an odd way, it’s a bit fascinating working on the house. You start to understand how and why it works. I like it.
So I’m not up-to-date on my terms, but I believe the 3 gang and 2 gang is the box itself, right? If so, is it possible to take out the current box and add a 3 gang box to the 2x4 inside, without ripping apart too much or any dry wall? Just wondering.
My current plan is to put a stacked switch in the current box. The only issue I can foresee is that there are currently 3 Romex going to the box; 1. The light itself, 2. The nearby outlet, and 3. Not sure what the correct term is, but it’s the Romex that gives the light and outlet it’s power. What I’m not sure about, is if I can stick another Romex (or 2) into the current box.
The box itself is metal, to my understanding is an older style of box. I wouldn’t mind a plastic blue one, as I feel it’s easier to work with, but mounting it to the wood without making the hole bigger is a concern.
|
TheRealBicycleBuck
> zeontestpilot
10/27/2015 at 10:09 |
|
I think many of the garage tinkerers are cut from the same cloth as the home tinkerers. Cross-posting homelopnik content to jalopnik should generate enough views to establish an audience. That’s how a lot of the other sub-blogs got started.
The hardest part about the bookcases will be getting things square. It can be done with a skill saw IF you use a saw guide. There are a thousand different ways to set up a saw guide.
Circular saws are cheap if you stick with a corded model. Just make sure you get a blade that is appropriate for finish-level work. The rip blades that come with most saws will leave the edges a mess.
It will be interesting to see if you decide to follow through!
|
zeontestpilot
> TheRealBicycleBuck
10/27/2015 at 10:39 |
|
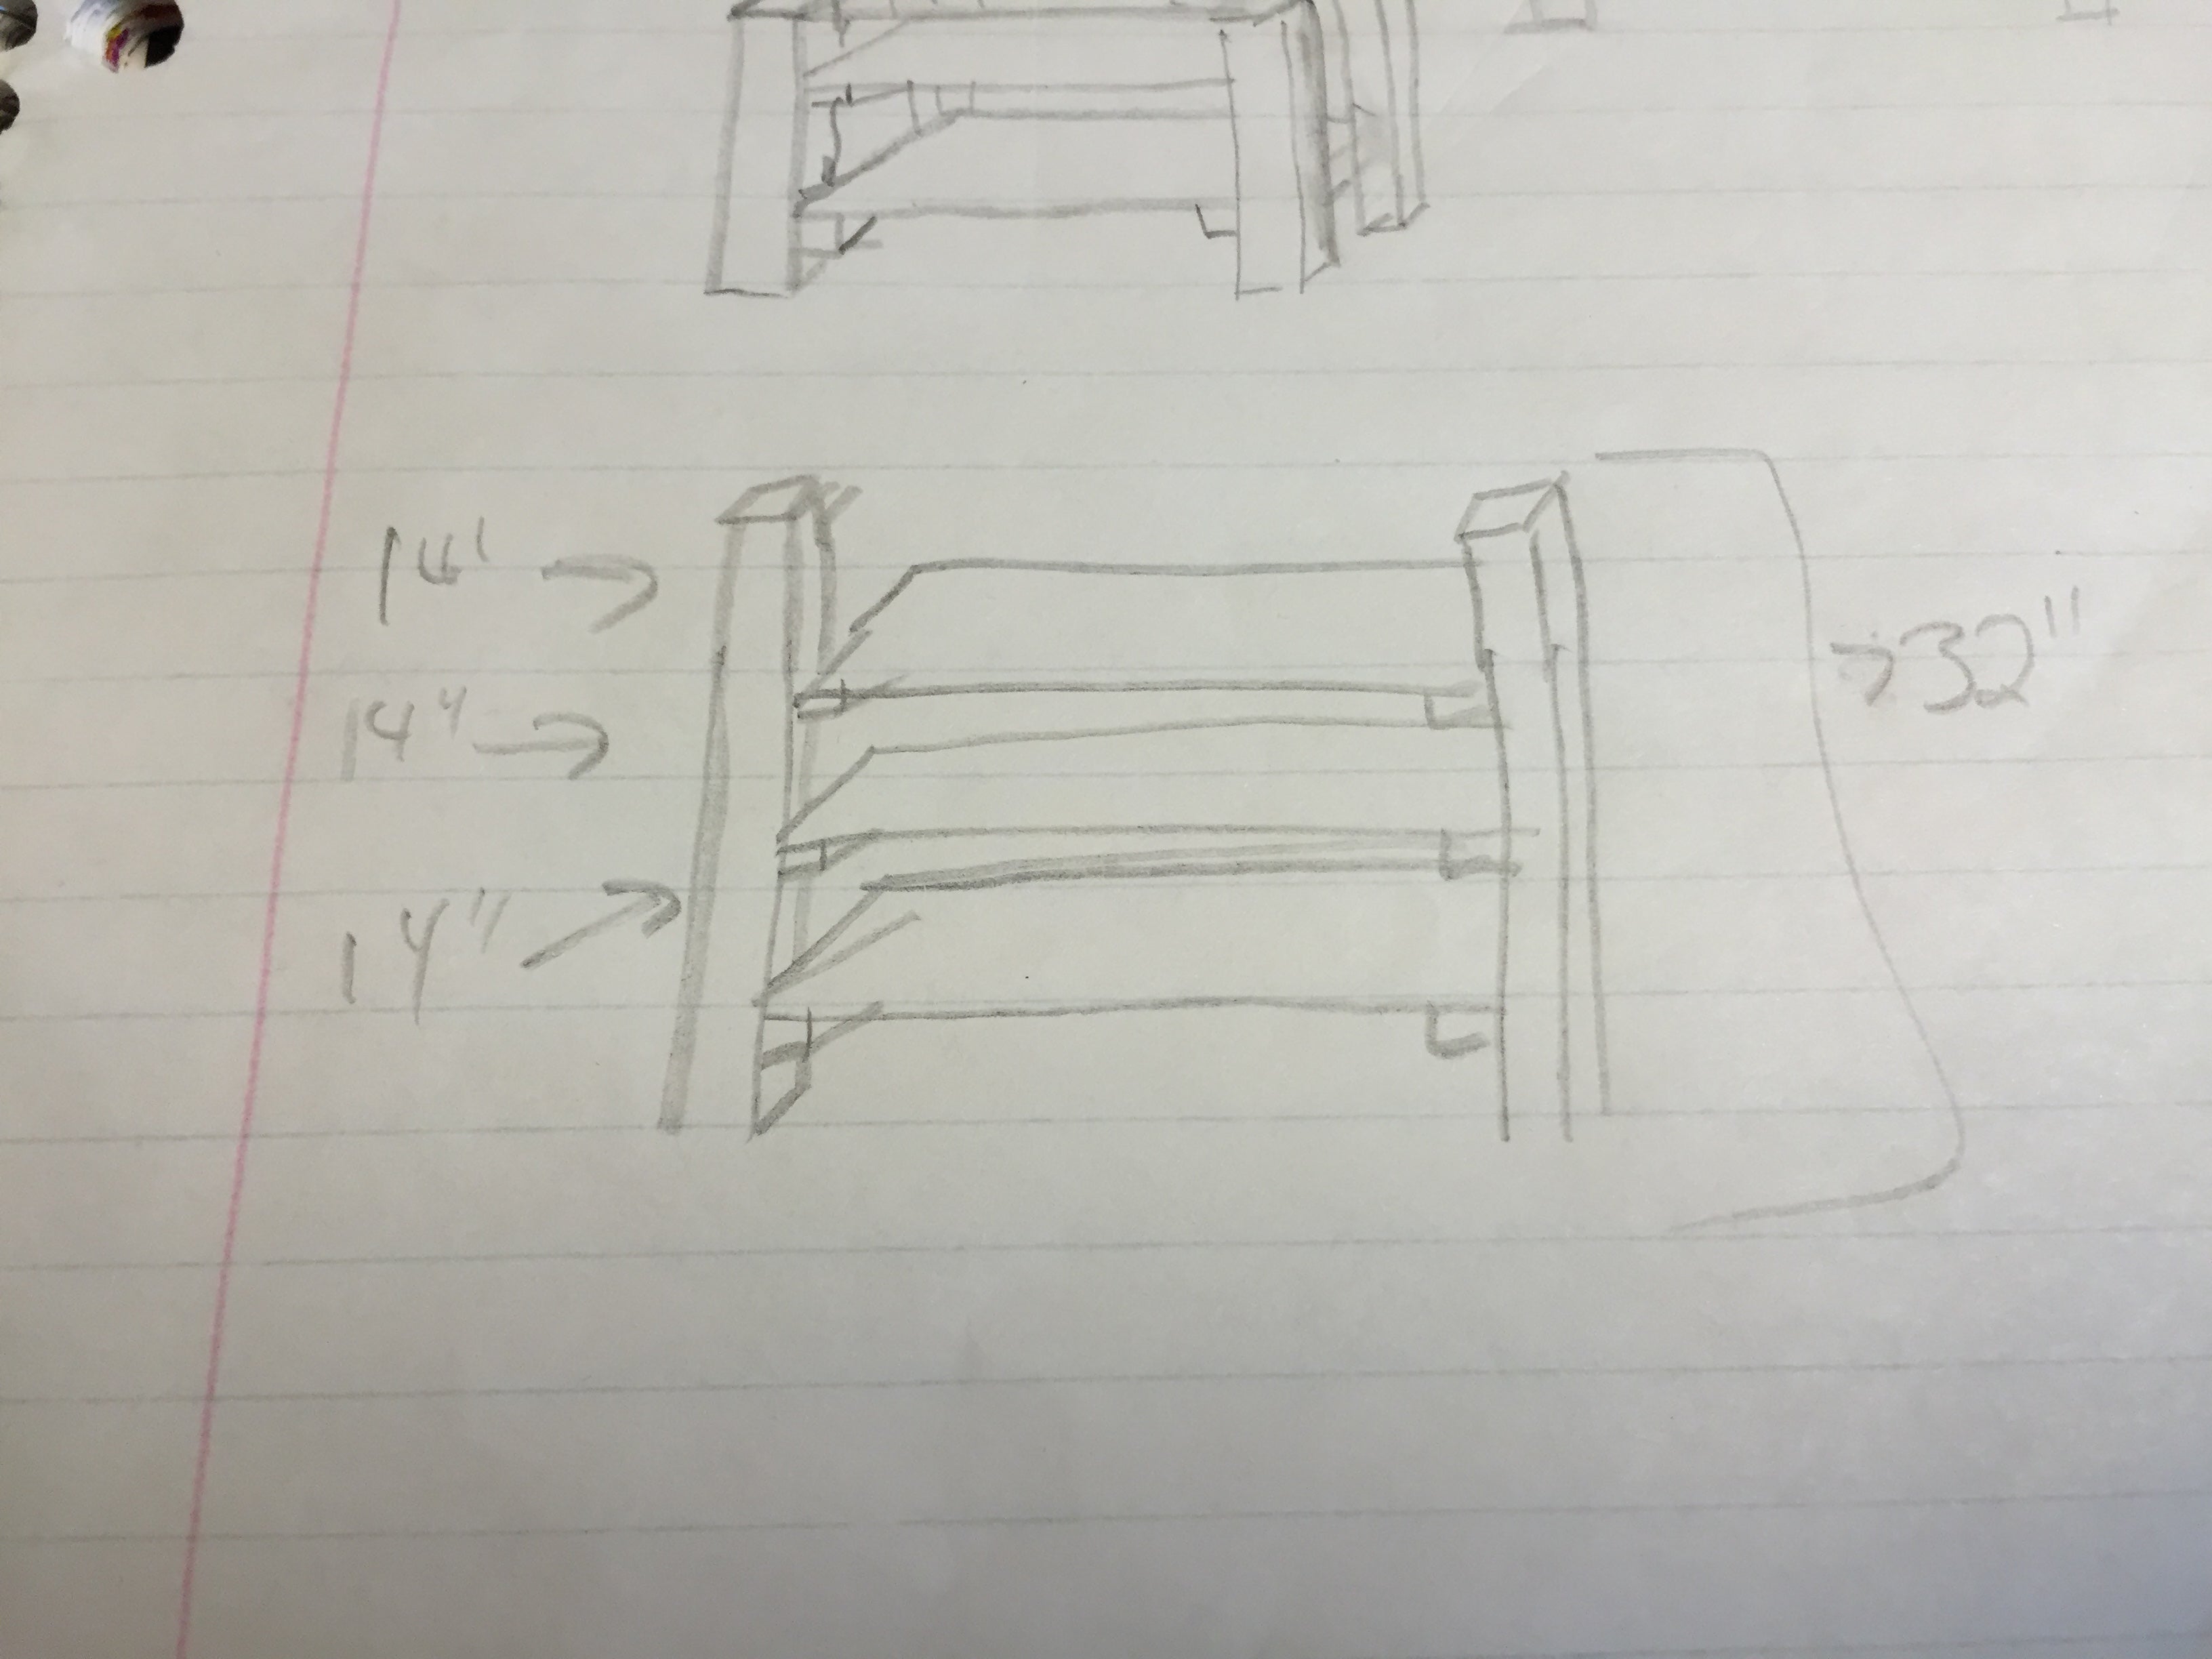
My idea is this, since we have a lot of heavy books, each shelf will be made of two parts, a support and a top part. Each support will be in the shape of a “H”, with the middle 2x4 connecting to two 2x2 pieces (one on each side). The top part will just feature a flat piece of wood that will just lay there.
Each side will be made of two separate 2x4’s. Umm, I think the best way to describe it would be that if you look at it from the side, it’ll look like a ladder. So it’ll be a pillar at each corner.
I’ll also add a plank of wood directly behind each shelf, to rest against the wall and to prevent books from falling behind it. I think I need a 1x4 for that.
This is my idea at least. I was thinking in strength of the shelves, and the lightness of the bookcase. Will have to build one to see if I'm just crazy or not, lol.
|
TheRealBicycleBuck
> zeontestpilot
10/27/2015 at 12:02 |
|
If you aren’t tied to the open shelf look, it is much simpler to build it as a plywood box. For the shelf supports, you can buy adjustable shelf inserts, or if you want MUCH stronger shelves, cut shelf rabbet joints, or just double-up the plywood between the shelf locations. The last option is also much easier to accomplish and still keep the shelving unit square.
Your description makes it seem like you are putting together modular/stackable shelves. These won’t be as strong as building something with solid legs the full height of the shelving unit.
|
zeontestpilot
> TheRealBicycleBuck
10/27/2015 at 12:27 |
|
I don’t its modular. I’m screwing together every part. Here a pic of a rough idea. The shelf is gonna be about 28” wide, and the legs will be 2” wide as well, so it’ll be 32” across.
|
TheRealBicycleBuck
> zeontestpilot
10/27/2015 at 13:57 |
|
Your design looks a lot like the Ikea shelves I had in college. The legs are held together by mortise and tenon joints with the mortise in the leg and the tenon on the stiles. Simple pins inserted into holes on the legs hold the shelves. There is a metal c-channel at either end of each shelf that fits on the pins. The most important piece is the diagonal bracing on the back. It is made of two metal rods flattened at the ends and the middle with a rivet in the middle to hold them together and holes at either end so they can be screwed to the shelves. Without this diagonal bracing these shelves fall down.
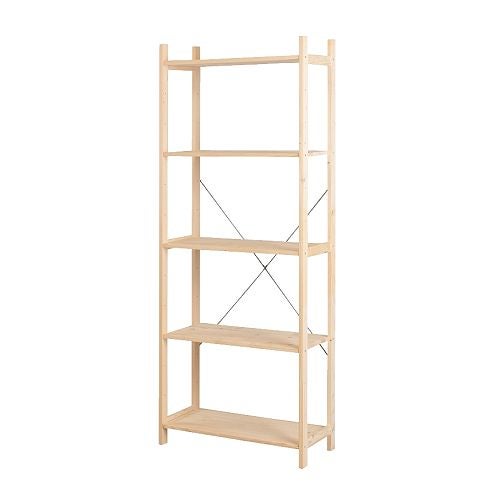
The last time I set them up, I forgot to screw in the bracing on one side and they fell down as soon as I let go.
Screws through the shelf supports to the legs won’t prevent the bookcase from shifting from front to back. If you don’t use a more solid joint, you will probably need diagonal bracing on both sides as well as the back. One way to provide that bracing is to use a solid sheet of thin plywood (3/16” or so) glued and nailed to the legs.
|
TheRealBicycleBuck
> zeontestpilot
10/27/2015 at 15:04 |
|
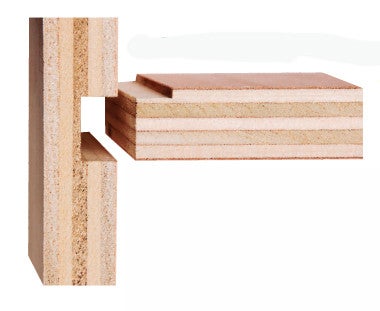
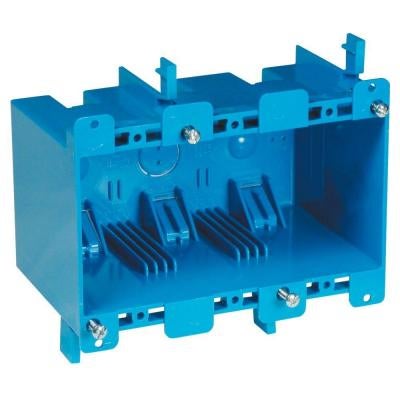
There are 3-gang boxes specially designed for renovations. As long as there is space between the studs, you can cut a hole and insert one of these. Tabs on the front lie against the face of the drywall. Tabs on the back (seen sticking up in the picture below) rotate into place when the screw on the front is tightened, then snug up against the drywall on the inside of the wall to hold the box in place. They also make 1 and 2-gang boxes if you don’t have enough room.
|
TheRealBicycleBuck
> zeontestpilot
10/27/2015 at 15:06 |
|
“I also have to replace the fan for the downstairs bathroom. But oddly enough, it doesn’t seem to actually vent out of the house, which needs to change IMO...”
Yep, that’s against code in most places. It doesn’t do much good to vent moisture from the bathroom into the space between the downstairs ceiling and the upstairs floor. Too many long showers with the vent running will result in mold.
|
zeontestpilot
> TheRealBicycleBuck
10/27/2015 at 16:26 |
|
It figures it isn’t up to code.
|
zeontestpilot
> TheRealBicycleBuck
10/27/2015 at 17:30 |
|
That's not a bad idea either. Hmm...
|
Snuze: Needs another Swede
> zeontestpilot
10/29/2015 at 14:26 |
|
Meant to reply to you about this earlier but just didn’t get around to it. TheRealBicycleBuck is right on the money, those are exactly the boxes I was thinking about. The only sort of difficult thing is fishing the wire into those little clips in the back, it can be a real pain.
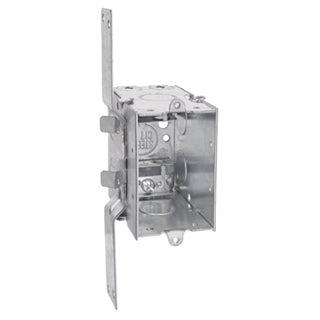
If it’s a metal box, it could be screwed to the stud from the side, which isn’t too bad. Just remove the screws and take it out, open the hole up, and install your new box. However, it could be attached to the stud with wings (see first picture)... in that case, good luck getting it out.
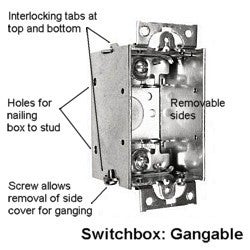
However, if it’s this style box, and you can get to the side cover screw, you can “gang” it... you need a ton of patients and a right angle offset ratchet screw driver though, to get in the wall to remove the side cover screw and reinstall it after you’ve added the extra box. I’ve done it before, It’s a huge hassle but in your case, with the wood paneling, it may be the only way without destroying the wall.
As far as wiring everything up, what you’re describing is and incoming feed (brings power from the panel to the switch box), the switch leg (power to the light) and a feed to the receptacle. If you want to use all three features of the fan (light, fan, nightlight) you need 3 single pole switches (basic switches, can only control something from one place) and 3 feeds up to it. I’d probably just use the existing wire to control the light, and run a piece of 14-3 up to the fan and use the black and red legs in that to control the fan and nightlight.
|
zeontestpilot
> Snuze: Needs another Swede
10/29/2015 at 14:53 |
|
You mean attach another box to the existing one?
|
Snuze: Needs another Swede
> zeontestpilot
10/29/2015 at 15:41 |
|
Yes. The issue you have there is that the box is cut right in the middle of the break between the wood panel and the drywall (or is that plaster?). If the box is attached in a funky method, like the metal one with wings above, it may be hard or impossible to remove without cutting the wall wide open to get to it. In that case, assuming the existing box is the same metal, gangable style, you can just get some of those gangable boxes and attach them to the side of the existing one. Now if it the wall were all drywall with no wood, it’s not too hard to patch that stuff and blend it in and make it look good, but you can’t do that with wood/plaster so you have to get creative sometimes.
Also, you’re going to have a helluva time with a remodel box (the blue one pictured above with the rotating tabs that hold it in place) because those boxes rely on the wall surface to hold them in - you have to cut the hole really precise, just barely big enough to get the box in, to seat the tabs on the front. But with the wood panel, you have a height difference between the top and bottom of the box. That’s why the current plate sticks out off the wall at the top.
This is why remodeling is frustrating. You look at something like that and go “Who the shit thought it would be a good idea to cut the switch in right on the break?!?”
|
zeontestpilot
> Snuze: Needs another Swede
10/29/2015 at 16:28 |
|
I'm thinking this, take the existing one out, replace with a 2 gang plastic one in the same place. That way, I can just make the notch for the wood bigger. I might have to cut higher up on the drywall, but I can always fix that later.
|
Snuze: Needs another Swede
> zeontestpilot
10/29/2015 at 16:56 |
|
I think you’re thinking the same thing I am. There’s drywall behind the wood, right? If so, use a dremel or carefully chisel to open just the wood up, just enough to hold the switch plate. That way everthing sits nice and flush. You’ll have to do that to get the plastic box to mount correctly, as well.
I was only bringing up the gangable metal boxes in case you can’t get the original box out.
|
zeontestpilot
> Snuze: Needs another Swede
10/29/2015 at 18:31 |
|
Im not crazy for the gangs me idea. We have a group of three lights that is a two gang box with a 1 gang, the 1 gang sticks out too far from the wall, we can’t get it flat.

What kind of Romex should I use for it? I'm not to familiar with the different kinds or what the numbers mean. I just need a hot, ground, and neutral.
|
Snuze: Needs another Swede
> zeontestpilot
10/30/2015 at 10:15 |
|
They make 2 types of gangable boxes, normal and extra deep. You can somehow still connect them together but the extra deep will stick out more. The more I think about it, the more I remember how much of a pain in the ass those things are. Hahaha. But trust me, there are situations where they come in handy. I think the blue plastic box is a much better choice if you can get it in there.
The quick primer on Romex is it’s sold as XX-Y. XX is the wire gauge, Y is the number of conductors (not including the ground wire). Common gauges you’d find in the house are 14, 12, and 10. In residential applications 14 gauge is good for 15 amps, 12 is good for 20 amps, and 10 gauge is good for 30 amps. Technically the wire can safely handle more (you’ll see this if you google wire size vs. current) but this is what the National Electrical Code permits it to be fused at. For your application 14 wire is fine. New Romex is color coded - 14 gauge has a white jacket, 12 has a yellow jacket, and 10 has an orange jacket.
For your fan, if you are going to use all 3 things (light, nightlight, and fan) you need 3 switch legs. You already have one running up there, so the easiest thing to do would be to use a 14-3 - it has a black and red, both colors are acceptable for use as hot conductors, a white (neutral) and bare copper ground wire. Rewire the fan so the existing conductor controls one thing, and use the new 14-3 to control the other 2. Then tie all the grounds together and all the neutrals together in the fan and in the box and you should be good to go.
Sorry if I’m going way overboard with information here, you just seem really interested in this, so I want to give you as much knowledge as I can. You said your grandpa is an electrician, so I’d also talk to him, he should be a great resource for you.
|
zeontestpilot
> Snuze: Needs another Swede
10/30/2015 at 11:12 |
|
So the 14-3 has two hots then? And I can hook up two separate devices to it? I wondered if there was something like that, cuz it would make wiring easier instead of feeding multiple 12-2 lines to it, Lol.
Nah, you’re good. I had to re-read it a few times, but I believe I get the gist of it. I prefer too much info, as it gives me a better understand of what’s going on. And you’re right, I am interested. I find it fascinating how it all operates together. And my gramps mentioned some of this stuff, but he didn’t give much context. he threw out 14-3 and I had little idea on what he was talking about. FaceTime explanations are difficult, :).