 "BJohnson11" (brettjohnson01)
03/26/2014 at 12:38 • Filed to: truck project, DIY
 4
4
 12
12|
"BJohnson11" (brettjohnson01)
03/26/2014 at 12:38 • Filed to: truck project, DIY | 4
| 12 |
My 74 C10 has some rust issues. While the truck is structurally sound, there are a couple of areas on the outer skin that have completely rotted through. Yesterday, I started tackling these issues, and I figured I'd write up a little step by step guide to repairing rust.
*Disclaimer: I am by no means an expert sheet metal guy. Hell, this is the first time I'd done this. I do though have a good amount of sheet metal/fabrication/welding/general shop experience, so a lot of these actions I'd done before, just not in this setting. The finished panel is by no means a show piece, and is more a function over form type piece.
Things you will need to tackle the job:
1) Replacement patch panel/sheet metal to fill the gap
2) Some sort of sheet metal cutting tools. I used a pneumatic cut-off wheel
3) Welder. I used MIG, but mostly because I was too lazy to get the TIG out.
4) Grinder
5) Sander
6) Bondo
7) Determination
Ok. So step one is going to be to assess the damage, and strategize your plan of attack. This involved wire brushing the whole area and seeing where the rust ended and solid sheet metal began. I chose to keep it simple, and just replace a large square of rust. I marked off the area with tape, and set about cutting.

Step 2: Cut out said area. Try to cut as straight of lines as possible, because you'll have to match the line you cut out of the panel with the cut you make in the patch panel.
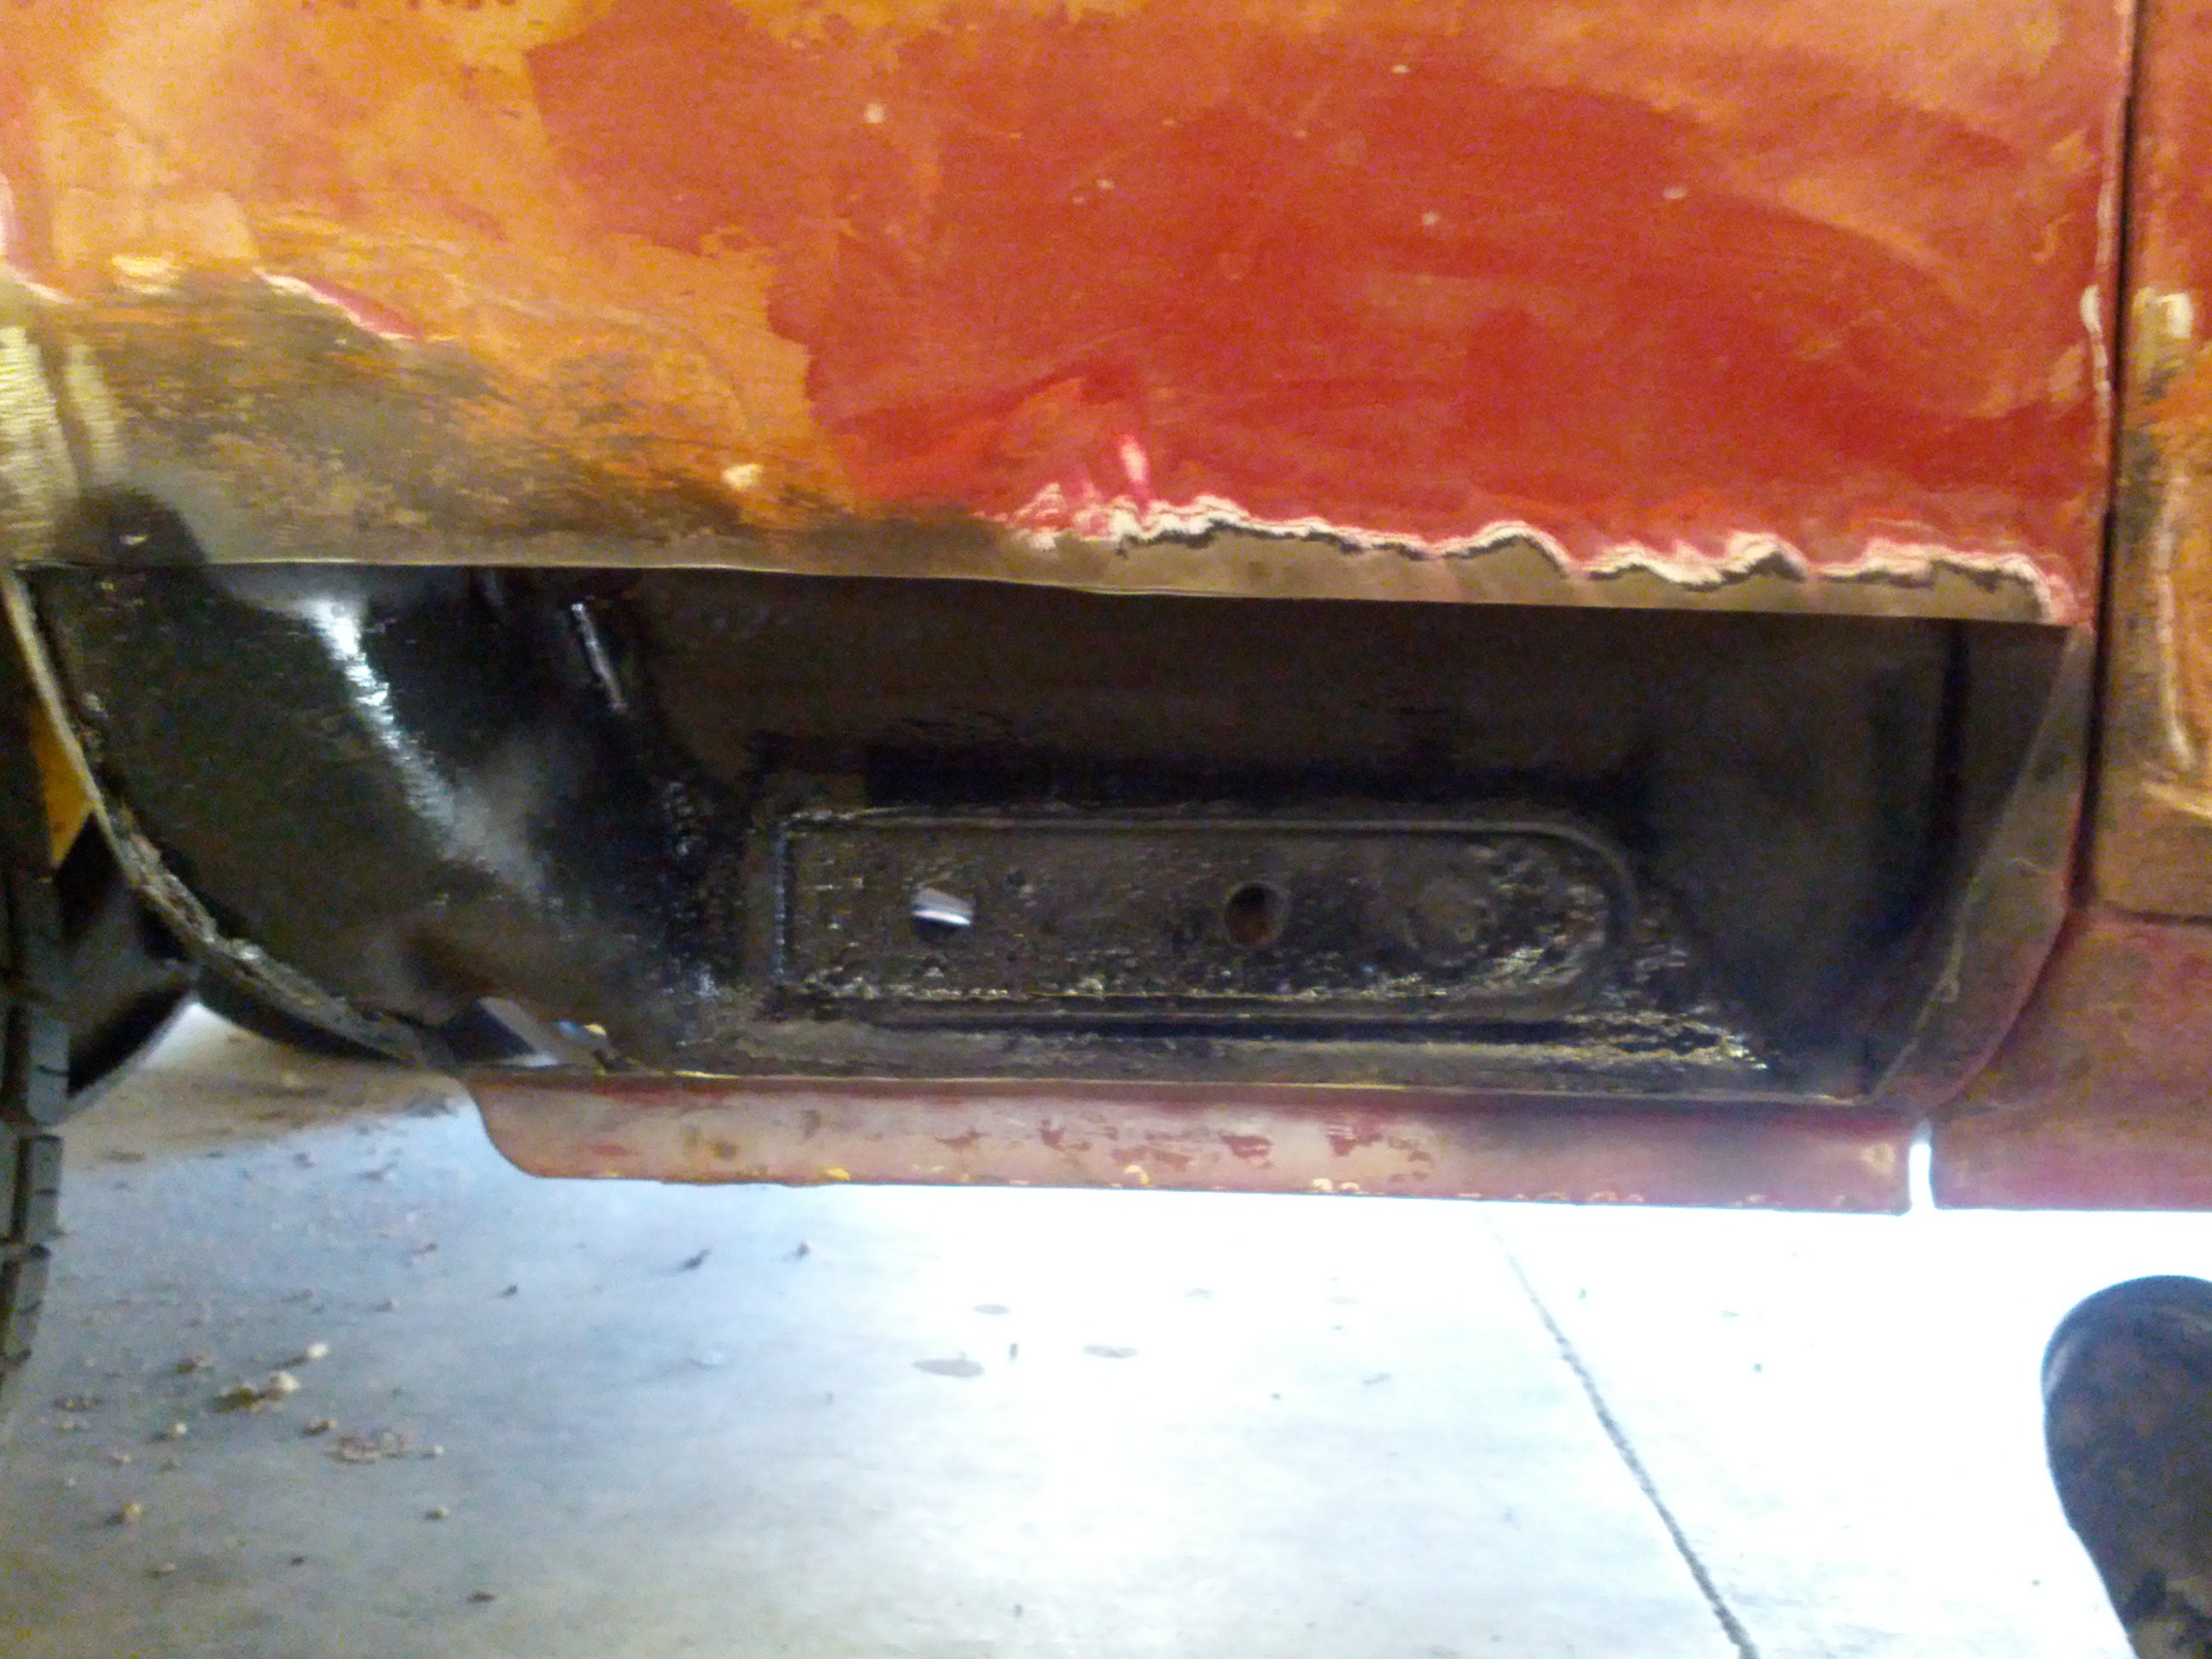
While I was at it, once the old metal was cut away, I wire brushed the inner panel, sprayed all the debris out, and shot some black primer over it. Just a little protection from future water somehow seeping into it.
So the next step after that is going to be prepping the patch panel. Now, this is where I'm not sure if the process I did was kosher, but it made sense to me. I think If I were replacing the whole area and not cutting a section out of the panel, it may have been easier than trying to measure and cut a very curved patch panel, but I also didn't want to have to cut the plug welds that welded the inner fender skin to the outer fender skin, so I chose to do just a square. Anyways, what I did was measured from a known point on the fender (I chose the crease at the bottom) to the corners of my cut area, and transfered those measurements to the patch panel. I then made sure the area was roughly the same by holding up the cut out section, and once I was satisfied, I made my cuts. It's slightly terrifying cutting up a brand new section of patch panel, until you realize it only cost like $13. Then its not so bad.

Once that's cut out, fit it up to the gap in the fender, and assess the fit. I ended up having to cut a tiny sliver to fill about a 3/8" gap, but the rest of the panel fit surprisingly well.
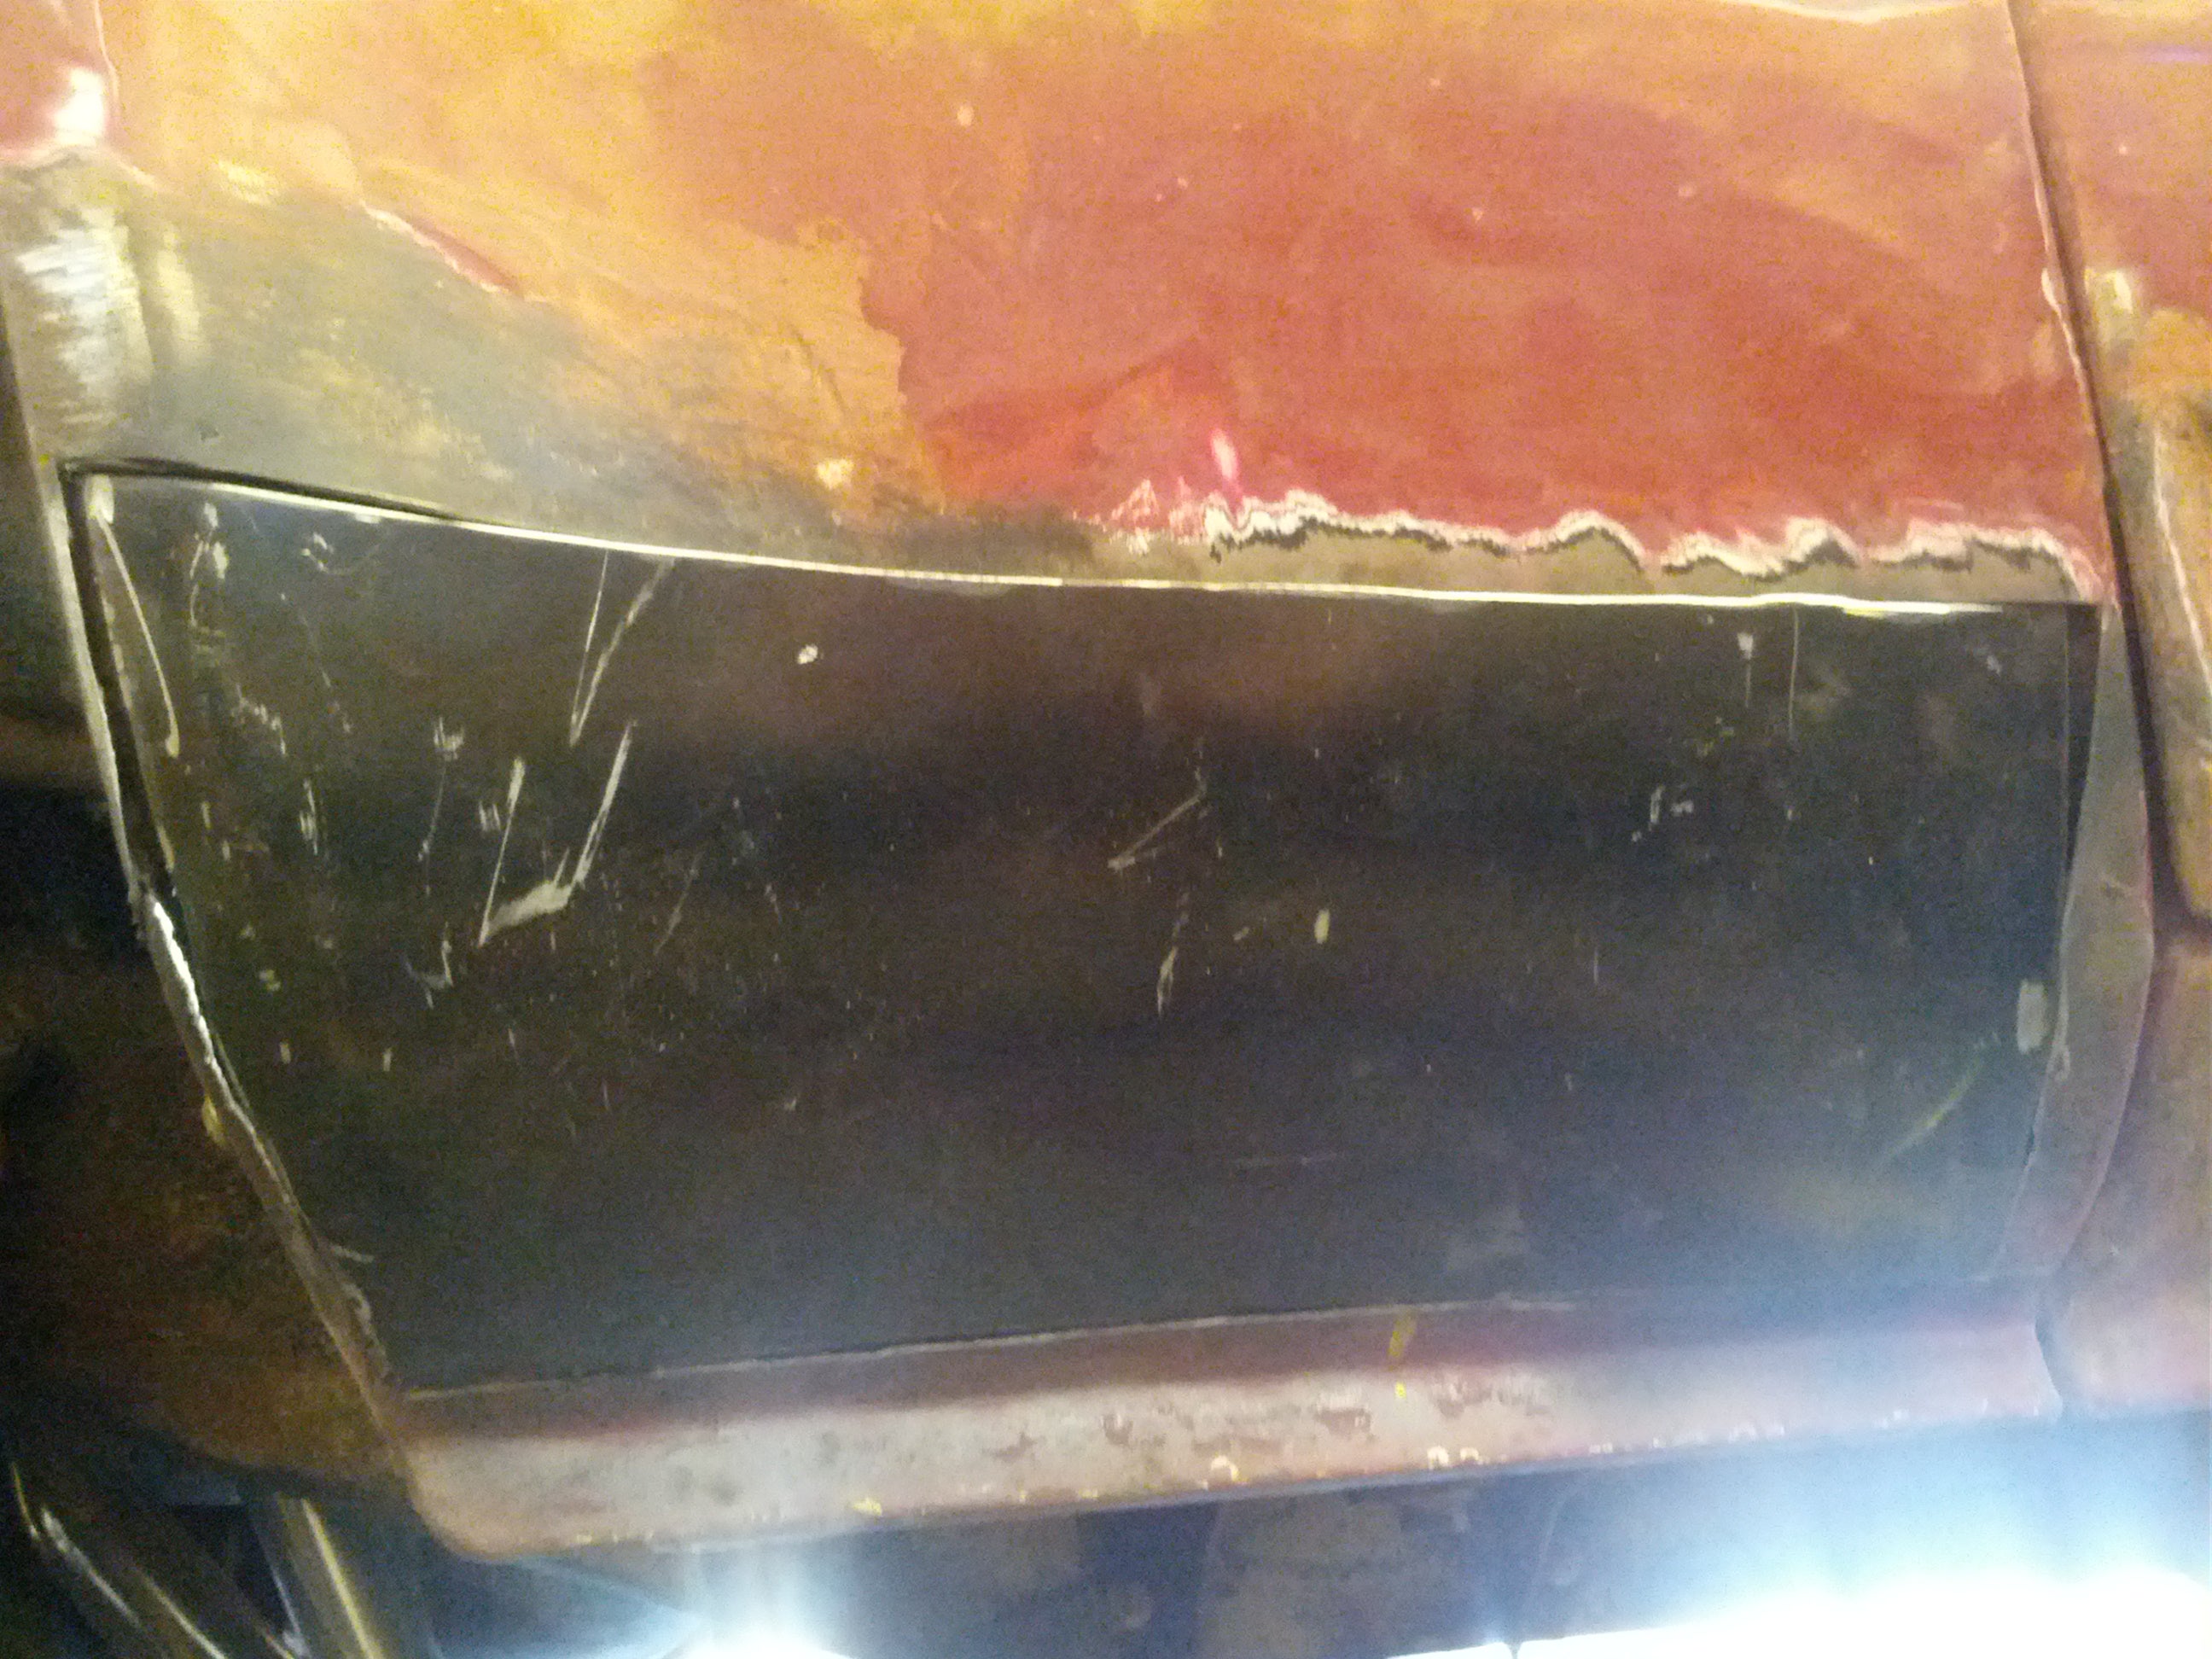
I think the patch panel, while a very decent fit, wasn't quite perfect. The curvature of the panel didn't match exactly on top, so I had to hammer the panel in to close in the gap. This also created a bit of a bump between the patch panel and the fender later, but that got smoothed out with grinding and body filler.

Now, it's time for welding. It's a tacking fiesta. Tack weld one spot to hold it in place, and move on. You never want to heat up one area too much or else you could end up warping the panel. And if you blow a hole in the metal? DO NOT CHASE THAT HOLE. If you keep trying to fill it right then, you'll just chase that hole all over the fender. Wait for the spot to cool down, and then come back later and fill it. For reference, I had my MIG (Millermatic 251) set anywhere between 14-15 Volts, with the wire feed between 90-125. These settings change though depending on what welder it is. Once you do all the welding (It takes forever), its time for grinding and body work.
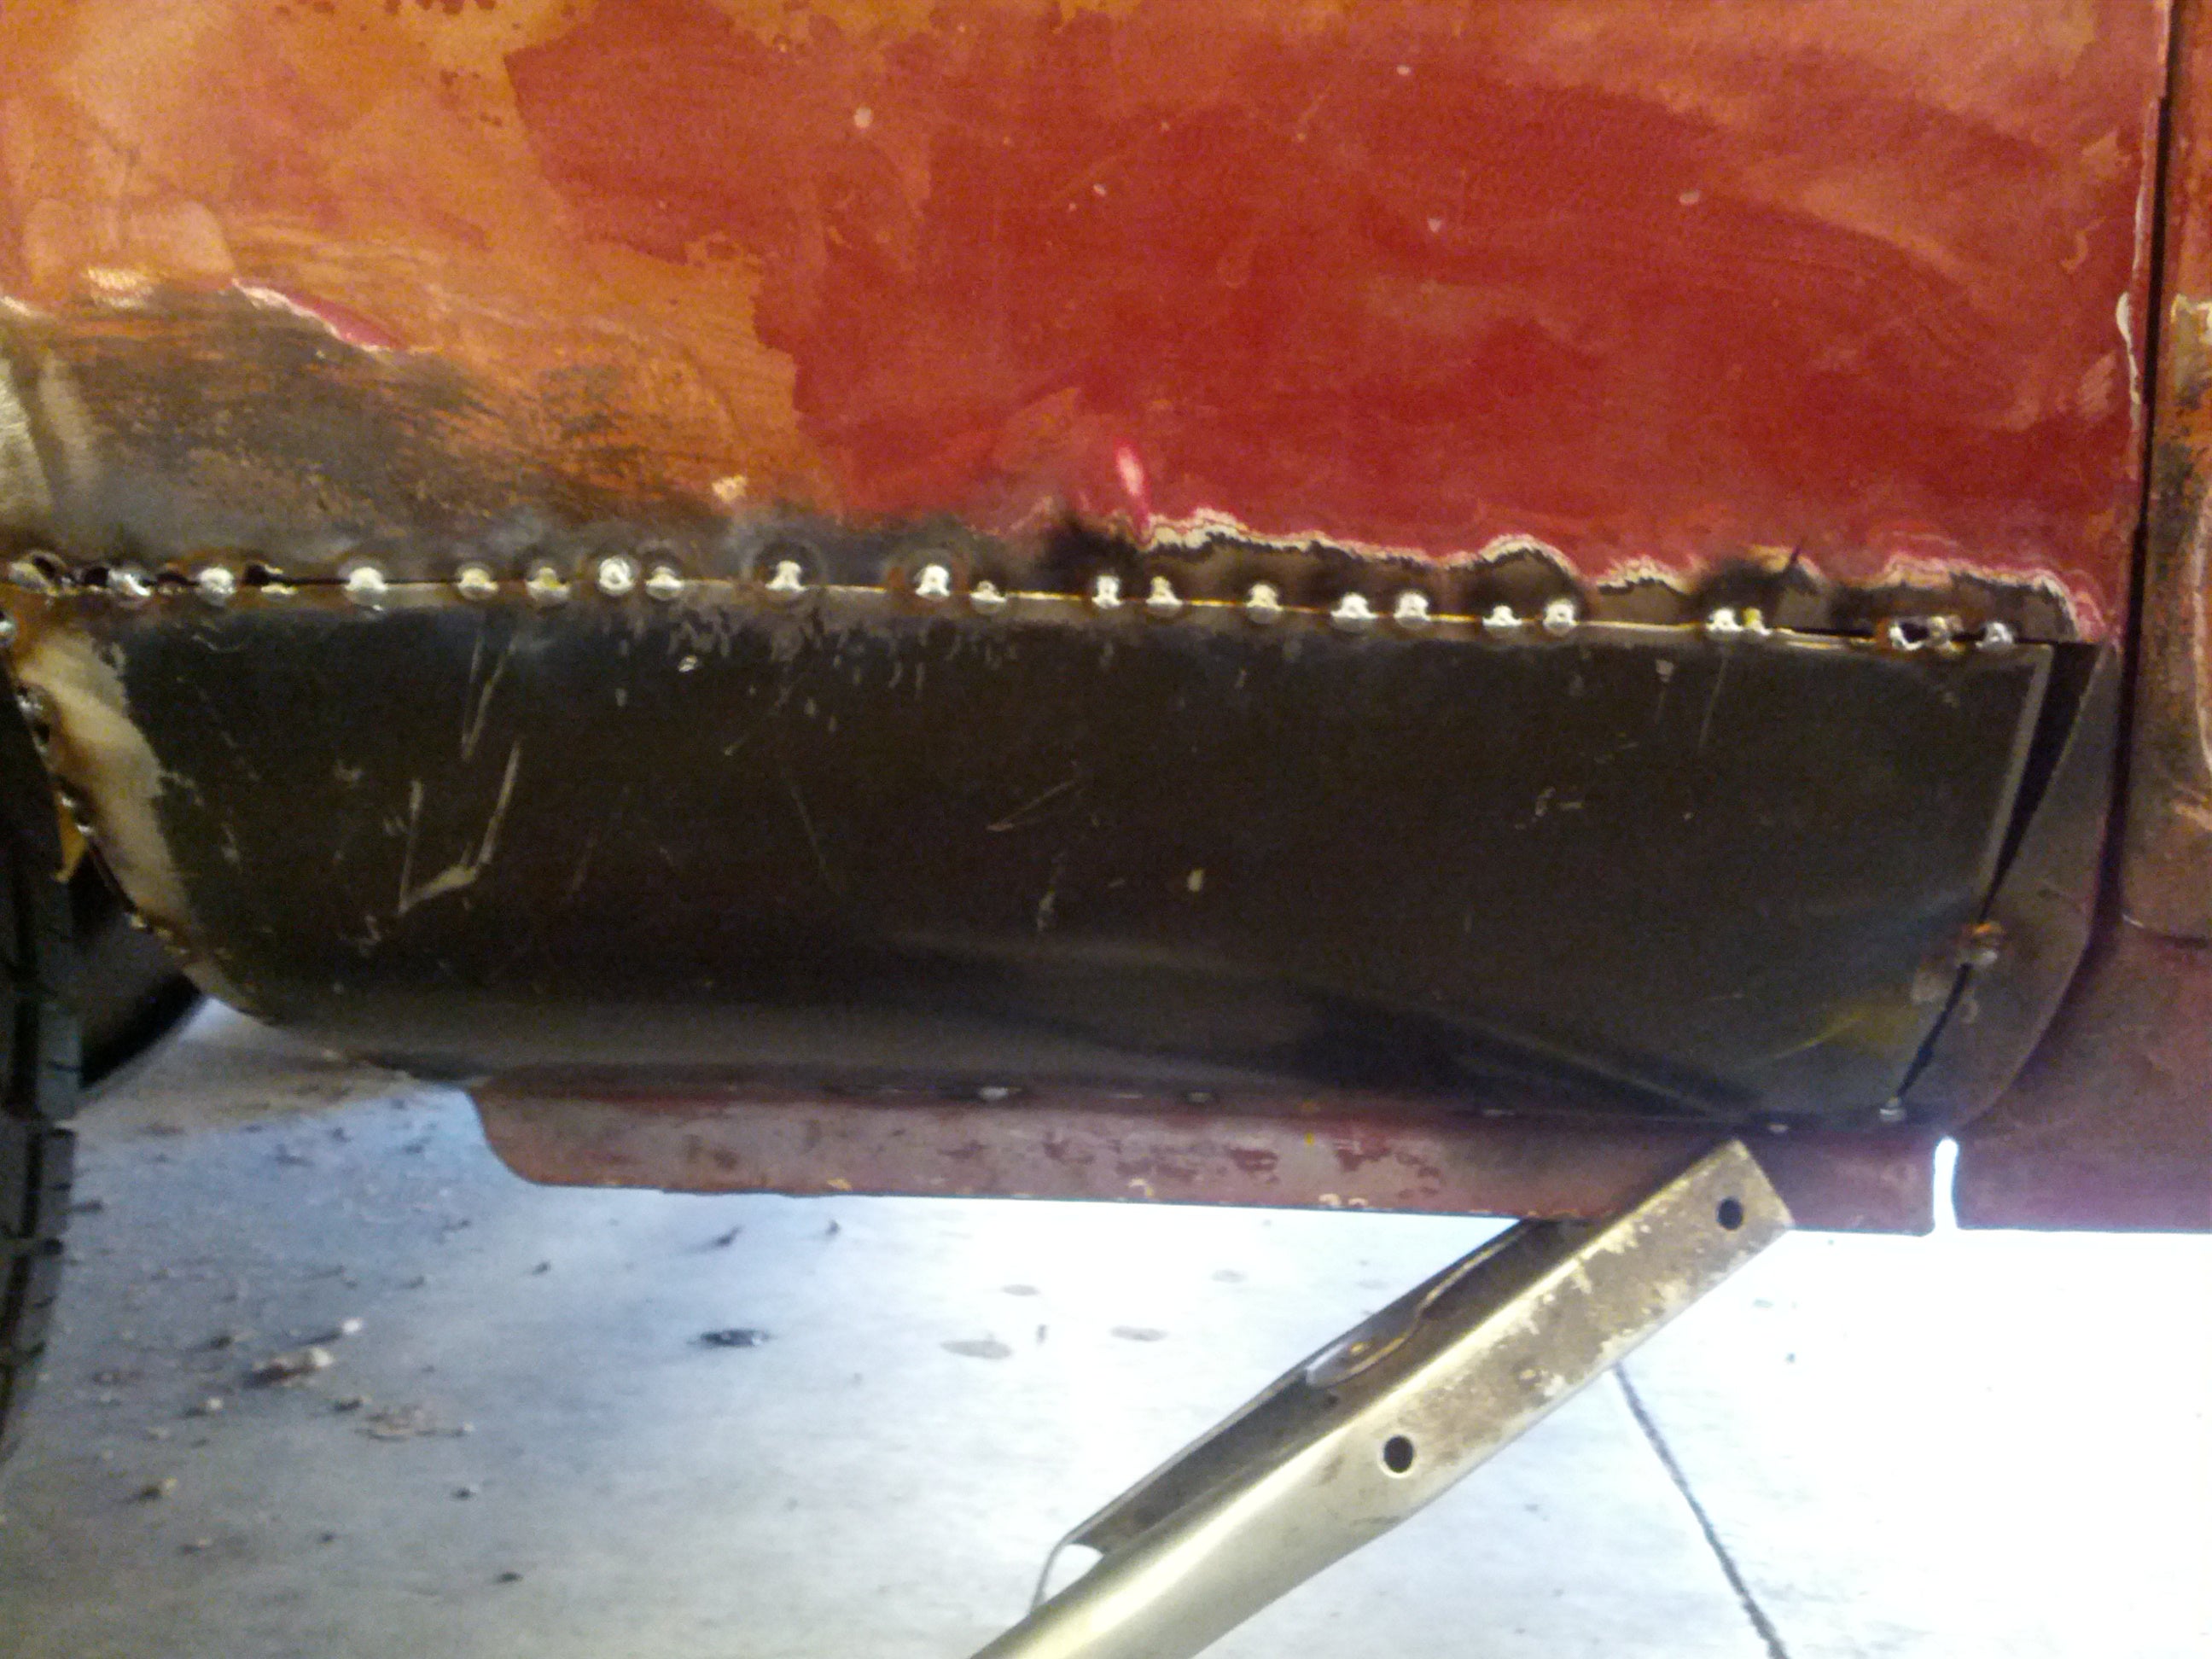
Grinding is just grinding. Dont grind too much away, you just want to get the panel smooth. Working with body filler is a little tricky. Once you have the filler and hardner mixed, you really do need to work fast. If there is a reasonably large sized bump to fill, do it in two steps; dont just try to pile a mound of bondo in the gap. Make smooth, quick applications with some sort of hard but flexible card, and once the bondo starts hardening, don't keep working it. Let it harden, sand it down, and apply again if needed.
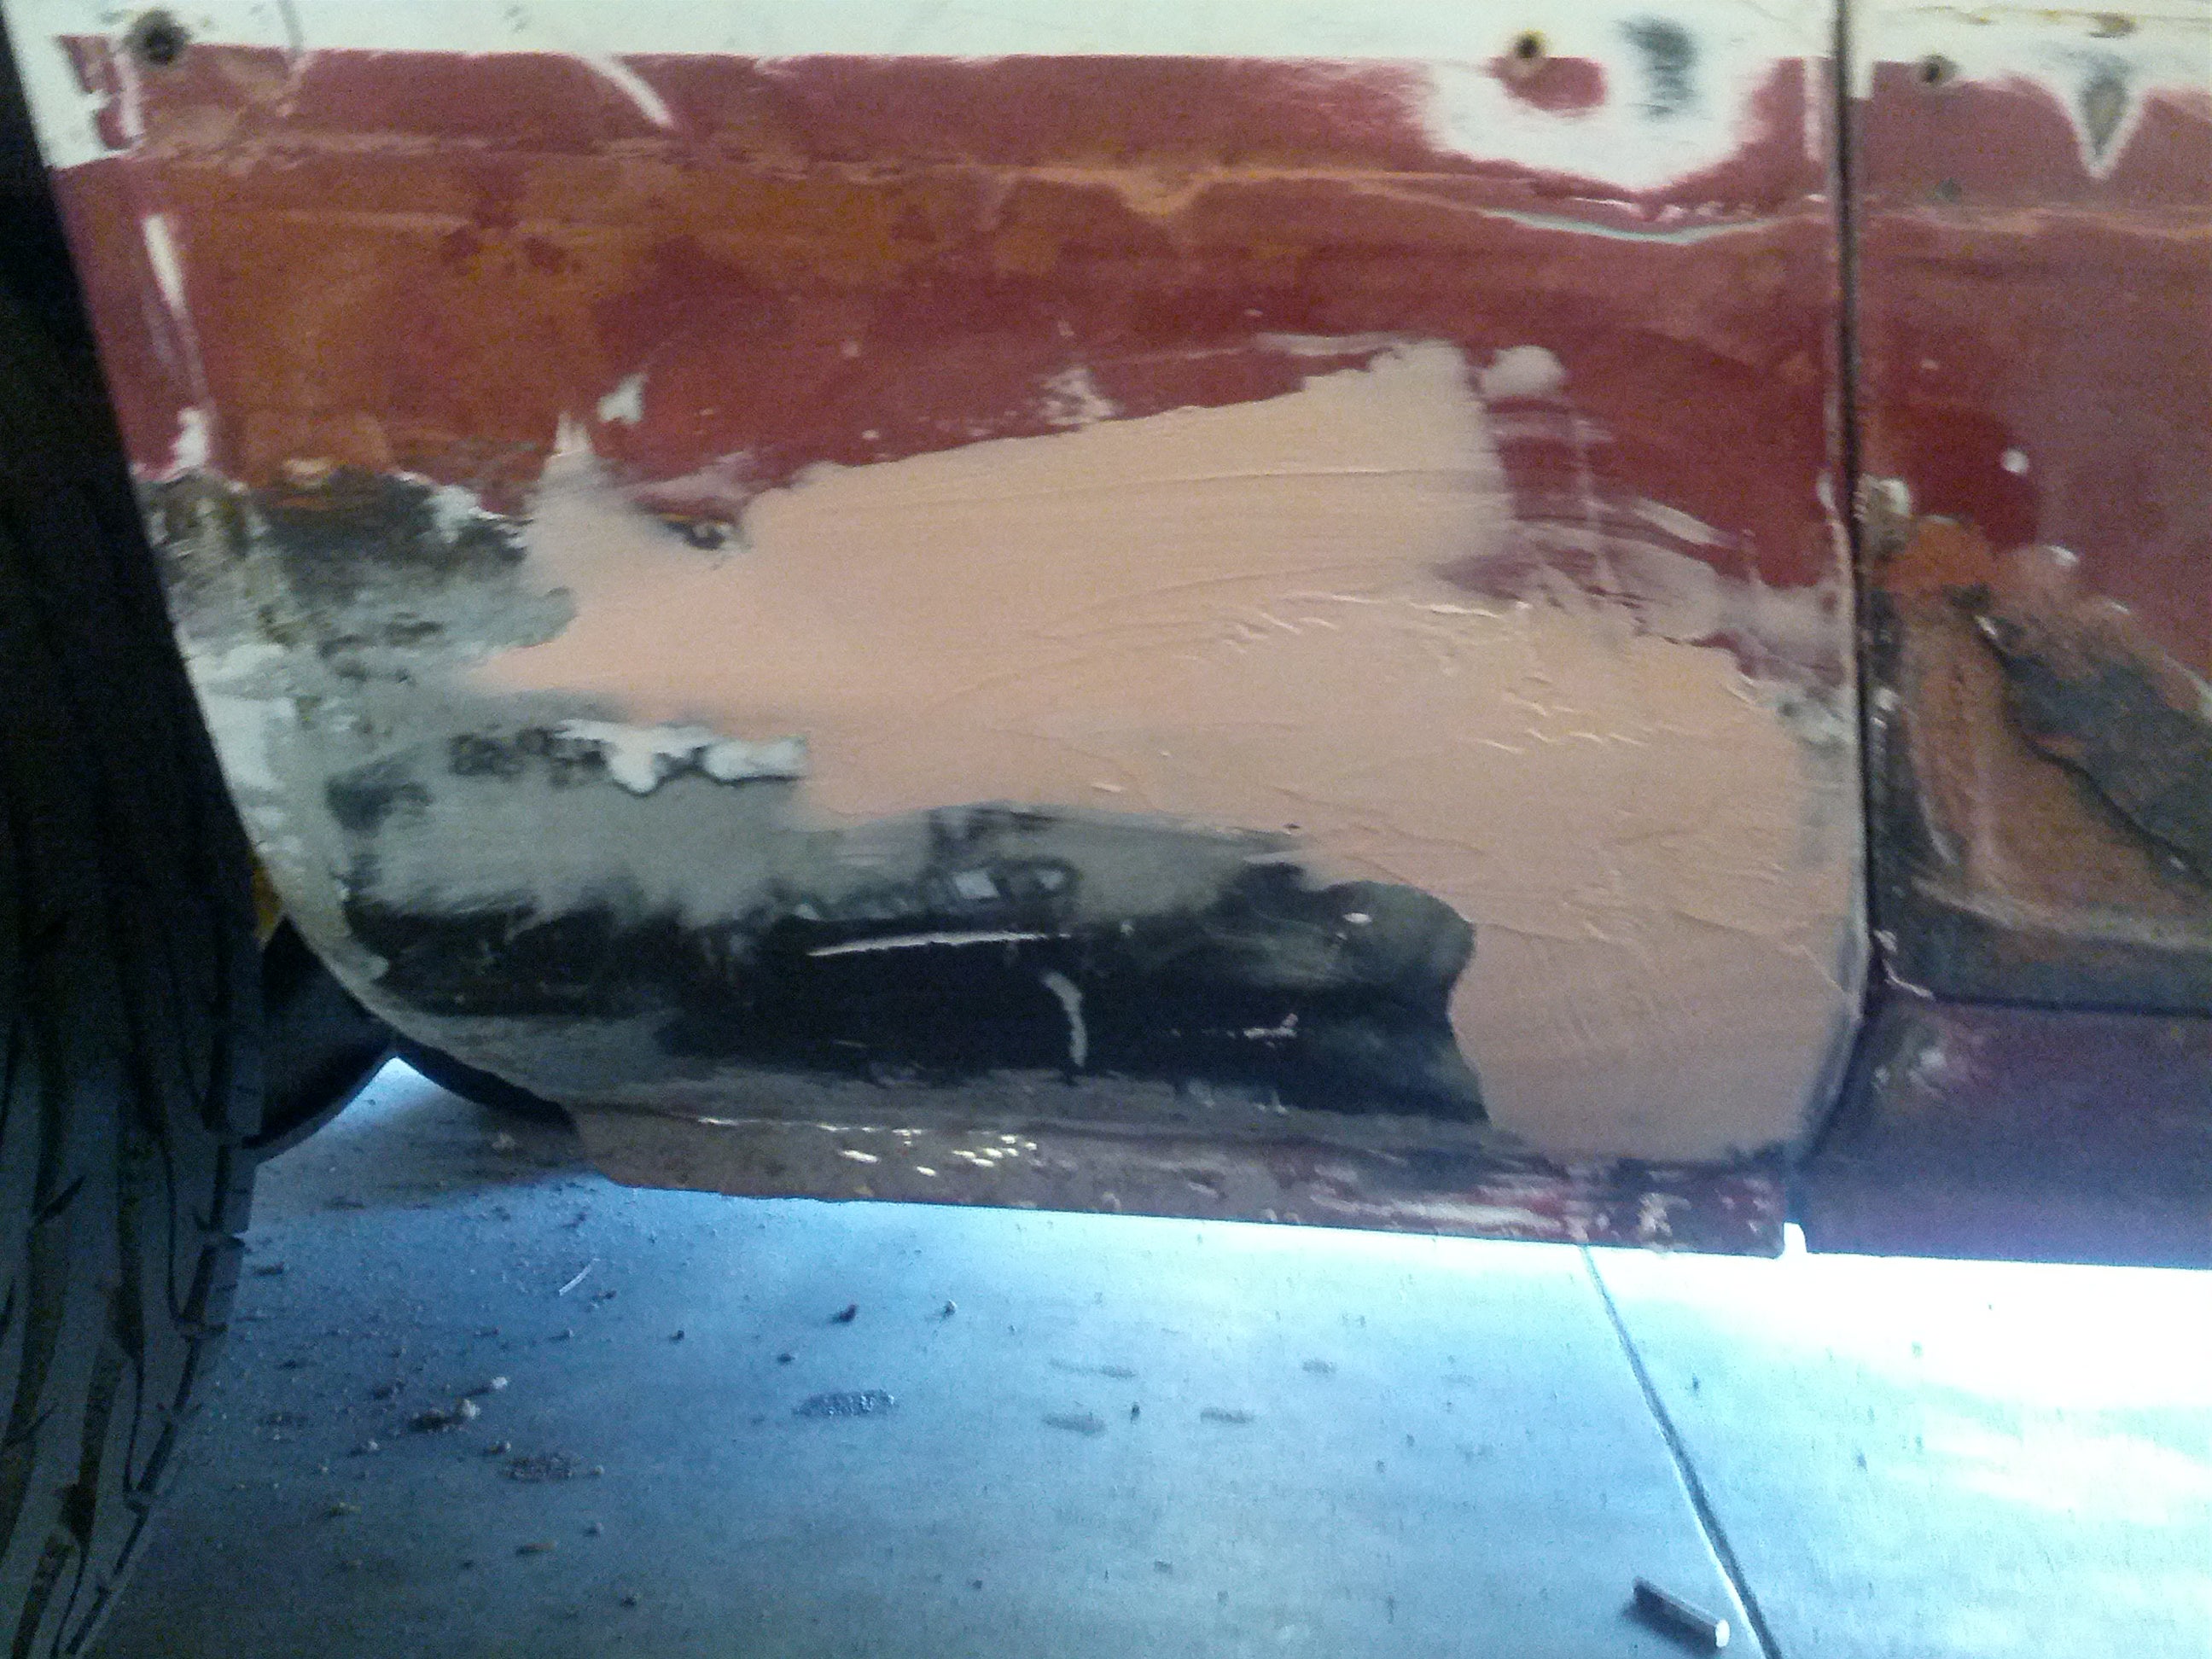
As you can see, not all of my welds needed body filler, and I was quite happy with that. After sanding, I realized I didn't have sealant primer at the shop, so I ran home to spray some on. As I got home, it started drizzling, so I hastily sprayed the primer on, and it ran a bit (that explains those ripples in the paint). I'll sand that down today, and everything will be nice and smooth.

Overall I'm pretty pleased with how the panel came out. It's not perfect, but it sure is a whole lot better than before. One patch panel down, a lot more to go.
 For Sweden
> BJohnson11
For Sweden
> BJohnson11
03/26/2014 at 12:44 |
|
I could buy a door patch panel for my 1972 C10 for around $30 and hope it turns out ok, or I could buy the entire door shell for around $350 and know it will be right. The latter is tempting.
 V8Demon - Prefers Autos for drag racing. Fite me!
> BJohnson11
V8Demon - Prefers Autos for drag racing. Fite me!
> BJohnson11
03/26/2014 at 12:48 |
|
Some inspiration for you.
http://s233.photobucket.com/user/daminc/me…
http://s233.photobucket.com/user/daminc/me…
http://s233.photobucket.com/user/daminc/me…
http://s233.photobucket.com/user/daminc/me…
And the full build thread. http://www.foxtbirdcougarforums.com/showthread.php…
|
BJohnson11
> For Sweden
03/26/2014 at 12:50 |
|
Check LMC. I bought a lower door skin and it was like $15, maybe $20. The problem with the door shell is you have to swap everything over, which is a pain, and then you have to deal with realigning the panel. Not saying its harder than cutting and welding, but it is a lot more expensive and still a decent amount of work.
Depends what you're looking for out of the truck though. If it's gonna get fully restored and become a show truck, a whole door skin might be right. Mine is gonna stay rusty and weathered and patina'd, so I didnt need perfection.
|
For Sweden
> BJohnson11
03/26/2014 at 12:52 |
|
It's a shortbed with a 4 sp, 4.11 gears, and 4WD. I'm afraid it's going to become too valuable to be a beater. :/
|
BJohnson11
> V8Demon - Prefers Autos for drag racing. Fite me!
03/26/2014 at 12:52 |
|
Know what I say to that? Start with a new car! That is one determined man though.
|
BJohnson11
> For Sweden
03/26/2014 at 12:54 |
|
Whole door shell might be the way to go then. I'd check LMC. At least for the 74 a door skin was only like $200 I wanna say.
 HFV has no HFV. But somehow has 2 motorcycles
> BJohnson11
HFV has no HFV. But somehow has 2 motorcycles
> BJohnson11
03/26/2014 at 12:59 |
|
nice work great write up.
here's what you don't do. I decided to shave the antenna off my 91 Civic, but i didn't have a welder. So I filled the hole with expanding foam insulation, covered that with a mesh screen, and bondo-ed over that. Did it work, yes, but it was stupid and I should have done it right. And yes the car was primer grey with diagonal blue metallic blue stripes on the hood.

 Philbert/Phartnagle
> BJohnson11
Philbert/Phartnagle
> BJohnson11
03/26/2014 at 23:36 |
|
Nice job and write up. You may want to get a panel flanger if you have much sheetmetal to replace. They make it easier to weld in a panel and with the extra thickness of the "flange" on the edges of the hole warping possibility is reduced.
 DetroitMuscle
> BJohnson11
DetroitMuscle
> BJohnson11
04/01/2014 at 08:09 |
|
From a professional standpoint,this is one of the better explanations out there.
Until the filler,sanding,and priming concept.That is what separates the good from the bad.And don't forget another important point,always keep some means of extinguishing the inevitable fire from destroying everything.
 BiTurbo228 - Dr Frankenstein of Spitfires
> BJohnson11
BiTurbo228 - Dr Frankenstein of Spitfires
> BJohnson11
04/01/2014 at 10:19 |
|
Nice work :) especially with shaping the patch to fit the panel.
Only a couple of things I'd add.
It's better if you've got a lipping tool (or just bend flanges into the edges with pliers) so you can slot a bit of the patch behind the panel and do a lap-weld rather than a butt-weld. Butt-welds can weaken the metal around them through resonance and crack. It's not often it happens, but it's a possibility.
The other thing I like to do is put a layer of primer over the patch underneath the filler. I've seen a good few vehicles that have been patched up, but then water's got under the filler and been trapped there. The filler's fine, but the metal's dead underneath. Judging by the quality of the other repairs they might have just been poorly done in the first place though. Painted filler should be pretty waterproof.
Oh, and I like to put some weld-through primer on the inside of the panel. It'll burn away where you weld, but it'll protect the rest of the inside.
All of these things are probably pretty OTT, but I plan on owning some pretty rust-prone vehicles during my time so it should pay dividends.
Any other ideas or tips would be very welcome :)
|
BJohnson11
> DetroitMuscle
04/01/2014 at 12:54 |
|
Thanks, and again, I'm by no means a professional body guy (just a college kid with a handful of fabrication ability). What would you change about the filler/sanding/priming concept? I'm always eager to hear other's opinions.
|
DetroitMuscle
> BJohnson11
04/02/2014 at 08:57 |
|
Once the welding,shaping,and hammering is done,enter into a process that someone with experience needs to be on hand to guide the process through untold steps that are fraught with potential mistakes.We all learn best through mistakes,but having an end result that just doesn't look right can be very discouraging.It took me a couple years of practice to achieve professional results.Sorry about using the mistake word so many times.There's a valid reason for that.Wish I could script a workable process but words won't do.