 "Pearson Hurst" (phurst)
02/24/2014 at 00:52 • Filed to: Scout, International Harvester, IH, 800A, oppositelock, myrustyhell
 3
3
 10
10|
"Pearson Hurst" (phurst)
02/24/2014 at 00:52 • Filed to: Scout, International Harvester, IH, 800A, oppositelock, myrustyhell | 3
| 10 |
My Rusty Hell or: How I decided to restore an old, rusty, semi-obscure vehicle with no experience and even less money (Part 8) - It's the little things...
It has been almost 6 months since my last update. The Scout is typically dormant for the winter, since the heat is poor, the weatherstripping is shot, and it's way less fun to drive with the top on. You might think that this would be prime "make progress on the project" time, but you would be wrong. Between getting settled at my new job, and the polar vortex (and related snow and ice), and my decided lack of a garage, or willingness to freeze my ass off, mean not much has been going on with the Scout. This weekend however, was absolutely gorgeous here in central Virginia, and my wife and kids were out of town, so I decided it was time to get in some work. Nothing major, as funds (as always) were limited to put towards Scout work.
One thing I KNEW I wanted to tackle was the fuel system. Scouts have a notorious fueling up problem. The filler neck runs almost horizontally and straight back from the fuel cap to the tank, which means you pretty much have to trickle gas in, or it's going to spill all over the side of the truck and the ground. It is litterally easier and faster for me to go fill up a 5 gallon gas can and then pour that into the Scout than trying to pump gas in at the station. In addition to this little gem of a problem, I had a few others as well. Something under there would leak fairly badly while fueling up, so I would end up with gas covered shes each time I put gas in, if I wasn't careful. Also, the sending unit for the tank is side mounted, and of course, mine leaked. Because of these problems, 1) I always smelled like gas 2) the truck always smelled like gas 3) the EPA probably got an alert every time I got gas and 4) the Scout had never enjoyed a full tank of gas under my ownership. These things made everyday life with the Scout a bit of a pain, especially considering that the tank is only 9 gallons, which meant I could never have more than 5 or 6 gallons in the tank.
Once I started on it, the source of the leaking during fill-up became immediately obvious:
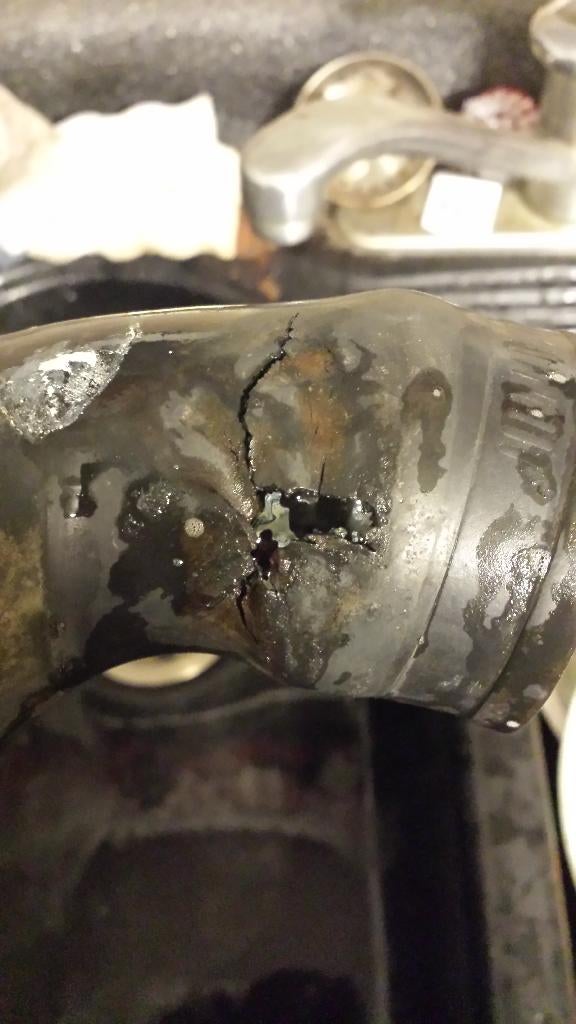
Since nowhere local carries this particular bit of unobtanium, I decided to just patch it up until such time that I can order a replacement. $76+ shipping is stupid expensive for a bit of rubber hose, but I have come to expect these things. The local parts store did happen to have a patch kit, so I grabbed that and it seems to be working fine, for now. While I was at the parts store, I picked up a sheet of cork gasket material and some Permatex fuel resistant sealant. I pulled out the sending unit, cleaned the heck out of the tank surface and the plate that holds the sending unit, and cut a new gasket. After a liberal application of Permatex, I put it all back together. The leaks now appeared to have been licked, which only left the annoying fill-up issue. The Scout was manufactured before evaporative emissions systems, so the only vent is a vented gas cap. Combine this with the new(ish) vapor recovery pumps, and you can begin to see the problem. Fuel goes in, but the air can't get out very easily, making filling up a painful process. To remedy this, I had to give the air somewhere to go. As I have seen other Scout owners do, I drilled a hole in the top of the tank and installed a brass hose barb. It's threaded on one end, and since the tank is polycarbonate, drilling a slightly smaller hole allowed the hose barb to screw in, cutting it's own threads along the way. To the other end, I attached some spare fuel line that came with the Scout. I routed it up, over the filler neck, and it end behind the rear fender.
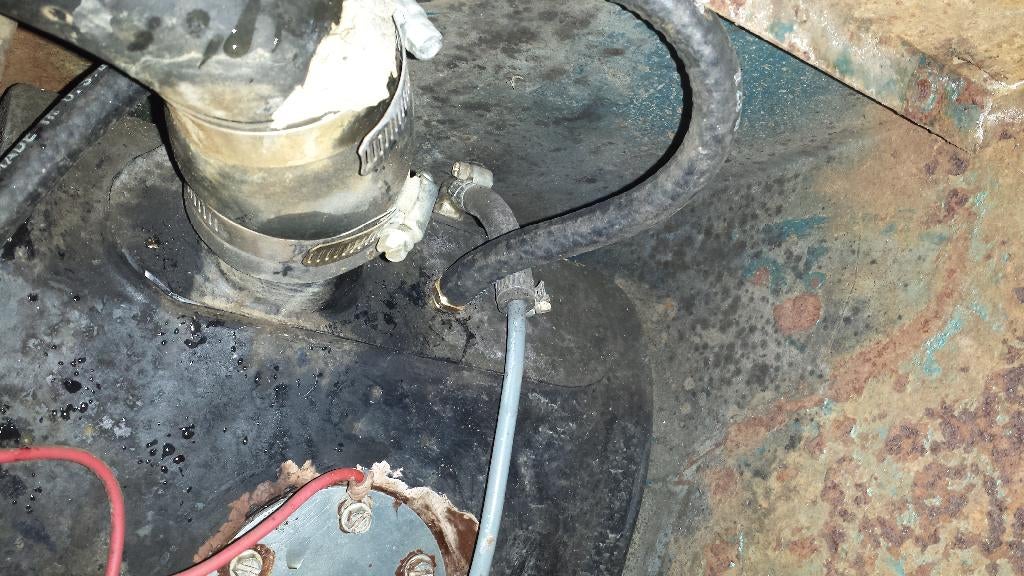
Yes, I did put a hose clamp on it right after I took this picture.
After I was done, I took it up to the station to try it out. After some trial and error, I found I could put the nozzle in sideways, and successfully pump at about 1/3 full speed. This is a MASSIVE improvement. Not only that, but the patched filler neck didn't leak a drop, nor did the fuel sender. I was so pleased, that I filled her up, all the way, for the first time. Like the title says, it's the little things in life that can make you happiest.
In addition to the fuel issues, I had one more big task I wanted to tackle. When I took the doors off last summer, I ended up breaking off two screws that attach the door to the hinge on the drivers side.
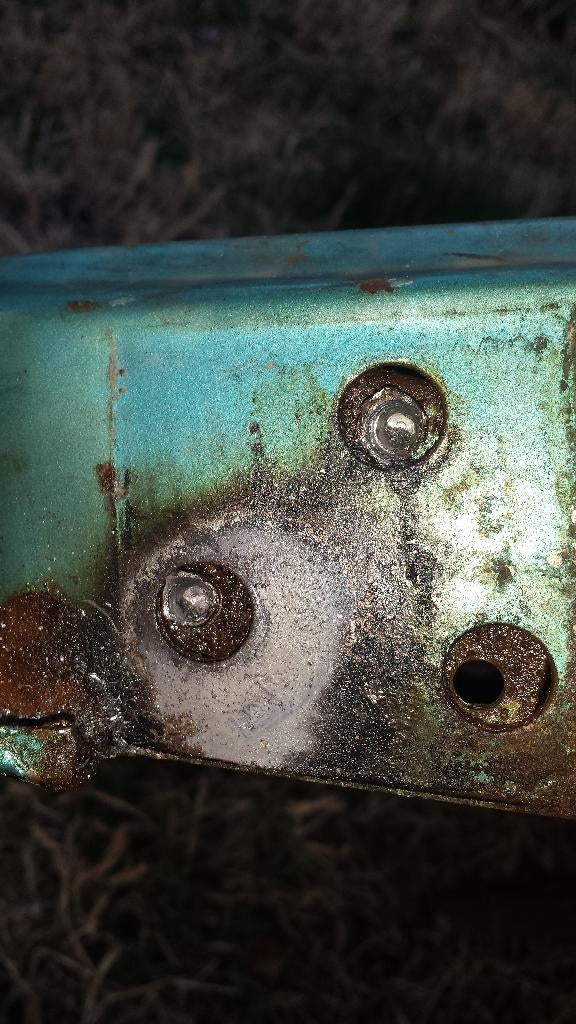
This meant that the doors were still in storage in the shed. I'm sure the neighbors hate the Scout already, and the fact that it was sitting in the driveway for most of the winter with no doors on it must have thrilled them to no end. It WAS convenient whenever I had to leave something for somebody to pick up when I wasn't home though, I;d just leave it in the passenger footwell, if it wasn't raining. Anyway, I decided it was time to tackle the broken screws and get the doors back on. The screws in question are 5/16"x3/4" 24 thread. An oddball size, to be sure, and I won't even get into how hard it was to find replacements locally. What a pain. So, I popped over to Lowe's (who had already let me down by not having the God dammed screws I needed) and picked up a broken screw and bolt extractor set. Not the traditional Easy Out type, but it was supposed to work on a similar principle. I followed the instructions for prepping the screw for removal, and promptly broke the extractor. I returned that piece of crap the next day, and bought a proper Easy Out type extractor set. I broke that one as well. I guess after 45 years, those screws REALLY didn't want to go anywhere. I tried pentrant, I tried heat, but nothing would make them give in. This left me with the only option of drilling them out and re-tapping the holes. Yay, another excuse to buy tools! I did manage to find a tap and die set with the correct tap, so I picked it up and set to work. Looking at the reference sheet, a 5/16" 24 thread calls for a drill bit sized "I". I shit you not, that's the bit size. I even looked around on the internet for tap bit sizes, and they all say "I". Having never heard of such a thing, I called around looking for one. I called hardware stores, I called auto parts places, I called everyone I could think of, and none of them had ever heard of a drill bit sized "I". Eventually, I decided that 1/4" was "close enough for government work" as they say, and started drilling. Things went easy enough, and I managed to re-tap the holes without trouble. I'll tell you now, I'm going to chase the threads of every screw, bolt and hole on this whole truck as things come apart. It makes reassembly of rusty bits SO much easier! IF you don't have a tap and die set now, stop reading and go get one, now. I'll wait for you.
With the doors reattached, and the fuel problems licked, I wanted to tackle a few other minor problems. I had a few bulbs out, which mercifully were available locally, and went in without too much of an argument. I still have a few dash lights that need replacing, but that will have to wait for another day.
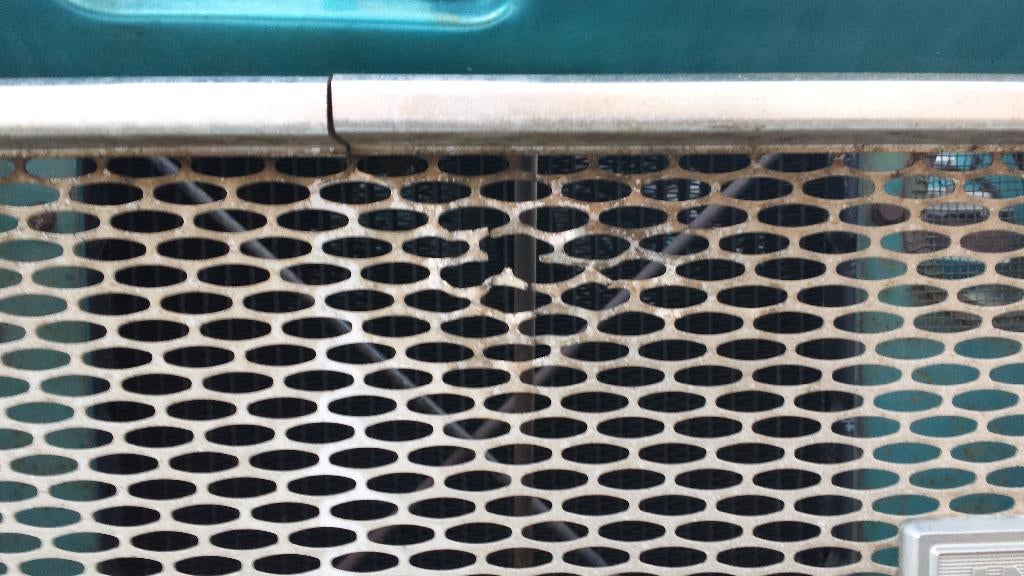
Last but not least, I wanted to try to do something about the hole in the mesh of my front grille. Replacements being hard to find, and, predictably, outrageously expensive for what they are, I decided to work with what was already there. It's obvious that SOMETHING went through the grille at some point. It's fairly heavy metal mesh, so it probably wasn't a rock. I imagine sometime during it's farm duty, someone drove it into a branch or something. While a hole in the grille is admittedly a very minor imperfection compared to the state of the rest of the truck, it has annoyed me since day one. With some needle nose pliers and some patience, I managed to bend all the bits back into something close to their proper positions.
So, that about sums up the baby steps taken this weekend, but progress is progress, especially when they make living with the Scout a more practical affair. I did put a few miles on her this weekend, but naturally, we're looking at more snow and cold weather next week, so it will probably be a while before I get another chance to drive her.
Tune in next time where I will try to fix more stuff with a budget of whatever change I happen to find under the couch.
 CalzoneGolem
> Pearson Hurst
CalzoneGolem
> Pearson Hurst
02/24/2014 at 12:25 |
|
I love reading about your scout. Sounds like a very productive weekend. I shoveled snow took a break and shoveled more snow.
 quarterlifecrisis
> Pearson Hurst
quarterlifecrisis
> Pearson Hurst
02/24/2014 at 12:27 |
|
Scout's are cool. We've got 3 old International's..but they're of a slightly larger variety.
A cool thing on Scouts...they were all assembled in Fort Wayne, Indiana. The company that has hauled 2/3 of the slightly larger Internationals back to Fort Wayne is located on old IH grounds, and one of their assembly locations is actually the factory where Scouts were built.
That being said, keep up the good work, once she's "done...ish" it'll be a great payoff.
|
Pearson Hurst
> CalzoneGolem
02/24/2014 at 13:19 |
|
Definitely less fun for you, but probably less frustrating than fighting with those screws. We're supposed to get more of the white stuff this week. Now that I have doors again, maybe I can go play in it.
|
Pearson Hurst
> quarterlifecrisis
02/24/2014 at 13:20 |
|
I hope so, though you know what they say about old cars and "finished"...
|
CalzoneGolem
> Pearson Hurst
02/24/2014 at 13:29 |
|
Yep. Given the choice to fight broken screws or shovel snow I'm going go go with the snow.
My truck's frame is an '88 but I bad to basically cut the rear suspension of it.
|
quarterlifecrisis
> Pearson Hurst
02/24/2014 at 13:49 |
|
I tried to keep it vague with done...ish.
 junkpants
> Pearson Hurst
junkpants
> Pearson Hurst
08/13/2014 at 08:53 |
|
Great reads! I am in the process of restoring a 1953 Dodge M43 Ambulance so all the archaic jargon is music to my ears. Old trucks are the best
|
Pearson Hurst
> junkpants
08/13/2014 at 09:24 |
|
Oooh, I'd like to see pictures of that!
|
junkpants
> Pearson Hurst
08/13/2014 at 14:48 |
|
I want to start a proper blog on the project, but it hasn't happened yet. Here are some links to vids and pics, enjoy!
http://youtu.be/o5DTjHoJFqE?li…
http://www.g741.org/photogallery/m…
It has some cancer that needs to be cut out and I plan to completely rebuild the engine and carb. I rebuilt the fuel/vacuum pump and added locking front hubs. A new wiring harness with modifications for a 24V air compressor (for the air horn of course) and a 24/12 converter to run a sound system are partially completed. If you haven't considered an electronic ignition module to replace the points+condensor, it's money well spent IMO. I recently lost fuel pressure so suspect a gunked up fuel pick up like you.
in the end I will paint it flat black with gloss black crosses. My wife hates it, but it's my 3.5 tons of fun!
|
Pearson Hurst
> junkpants
08/13/2014 at 15:10 |
|
That is epically awesome. If you get around to a blog, be sure to send me the link.
I've considered converting to a pertronix ignition, but I understand they have a higher failure rate than the good old points and condenser, and for a few bucks, I can carry spares of those in the glovebox.
BTW, it's not a proper project unless your spouse hates it :)